Updated 2026 · By No Damage Decor Editorial Team · Reading time: 9 minutes
Command Strips Weight Limit Guide: What They Actually Hold (And When They Fail)
⚡ Key Facts at a Glance
- Small Command strips: up to 1–4 lbs per set
- Medium Command strips: up to 12 lbs per set
- Large Command strips: up to 16 lbs per set
- Weight limits assume smooth, clean, painted drywall
- Textured, wallpapered, or freshly painted walls significantly reduce hold strength
- Correct removal (pull straight down slowly) protects your deposit
Renters choose Command strips because they offer a damage-free way to hang art, frames, and organizers without nails. But “damage-free” only holds true when you use the right product for the right weight on the right surface. This guide breaks down exactly what Command strips can hold, what affects performance, and how to use them without risking your deposit.
If you’re just getting started, see our complete no-damage wall decor ideas guide for a full overview of renter-safe hanging options.
How Command Strips Work — And Why Weight Limits Matter
Command strips use a proprietary stretch-release adhesive developed by 3M. The adhesive bonds tightly to smooth surfaces and can be removed without residue when pulled at a 180-degree angle along the wall. The weight limit printed on every package is the maximum load tested under ideal laboratory conditions — smooth painted drywall, correctly cleaned, with strips fully cured (1 hour wait after application).
Real-world performance is almost always lower. Rough textures, humidity, temperature swings, matte paint, or skipping the alcohol wipe all reduce how much the strip can safely hold. This is why the #1 rule for renters is: always stay well under the stated limit.
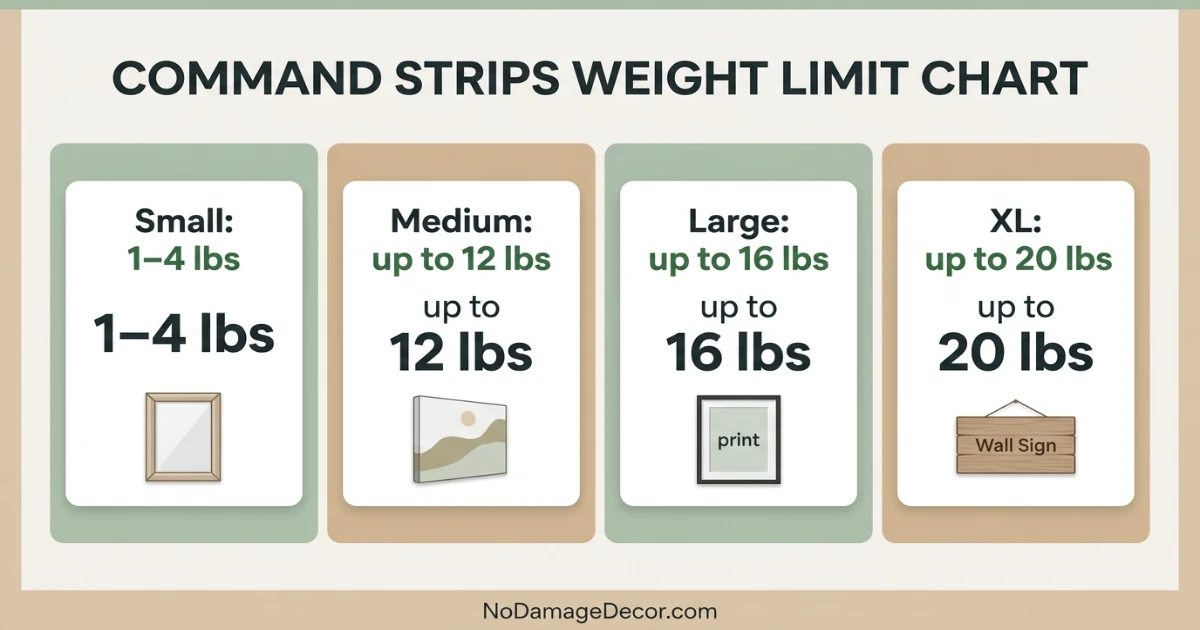
Command Strips Weight Limit Chart: Every Product Type
The table below reflects manufacturer guidance. Always verify against the specific packaging — product lines change and regional variants may differ.
| Product | Size | Weight Capacity | Best Use Case | Surface Fit |
|---|---|---|---|---|
| Picture Hanging Strips | Small (4 pairs) | Up to 4 lbs | Small frames, lightweight prints under A4 | Smooth |
| Picture Hanging Strips | Medium (4 pairs) | Up to 12 lbs | Canvas art, medium wood frames | Smooth |
| Picture Hanging Strips | Large (4 pairs) | Up to 16 lbs | Large frames, lightweight decorative mirrors | Smooth |
| General Purpose Hooks | Small | Up to 1 lb | Keys, lightweight accessories | Smooth / Tile |
| General Purpose Hooks | Medium | Up to 3 lbs | Towels, robes, bags | Smooth / Tile |
| Large Hooks | Large | Up to 5 lbs | Heavier bags, kitchen organizers | Smooth |
| Heavyweight Strips (XL) | XL (4 pairs) | Up to 20 lbs | Oversized frames, wooden signs | Smooth only |
| Outdoor / Water-Resistant | Varies | Up to 5 lbs | Bathrooms, kitchens, outdoor surfaces | Tile / Metal / Painted |
| Velcro-Style (Repositionable) | Small–Large | 1–10 lbs | Lightweight posters, cork boards | Smooth only |
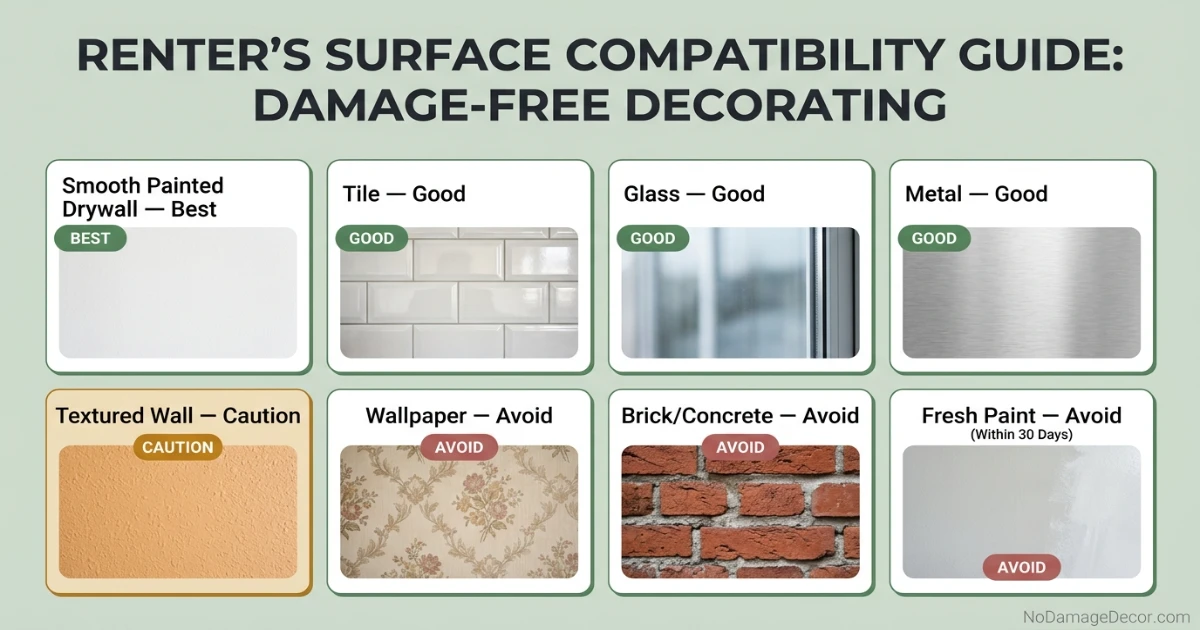
What Surfaces Command Strips Work On (And Which to Avoid)
| Surface Type | Command Strips Work? | Notes |
|---|---|---|
| Smooth painted drywall (eggshell/semi-gloss) | ✓ Best | Ideal surface — full rated weight capacity |
| Flat/matte painted walls | ⚠ Caution | Paint may peel on removal — test first |
| Ceramic tile (bathroom/kitchen) | ✓ Good | Use bathroom-specific Command products for humidity |
| Glass / Mirror | ✓ Good | Clean glass well — holds reliably |
| Stainless steel / Metal | ✓ Good | Works well on smooth metal surfaces |
| Textured / Orange peel walls | ⚠ Limited | Reduced adhesion — use more strips, lower weight |
| Wallpaper | ✗ Avoid | Risk of peeling wallpaper on removal — never use here |
| Brick / Concrete / Cinder block | ✗ Avoid | Too porous — strips will not hold |
| Fresh paint (under 7 days) | ✗ Avoid | Paint hasn’t fully cured — will pull off with strip |
| Wood paneling | ⚠ Varies | Depends on finish — test first, light loads only |
For renters dealing with tricky surfaces, our guide on how to hang things on textured walls without damage covers alternative methods including adhesive putty and tension rod systems.
Step-by-Step: How to Apply Command Strips Correctly
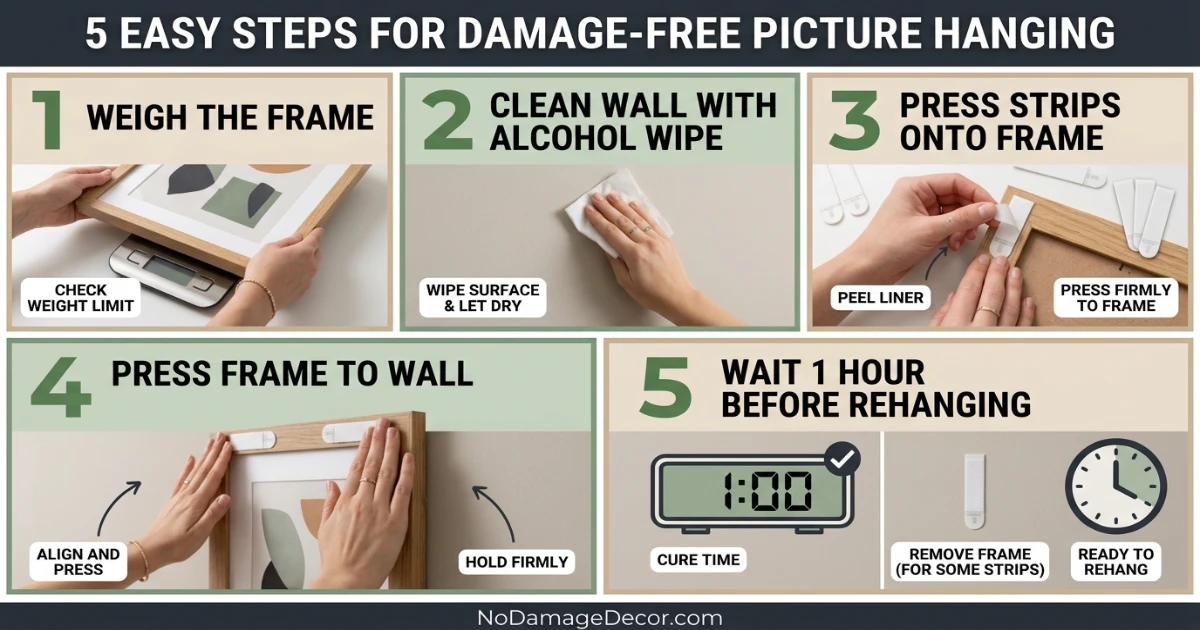
Correct application is what separates a strip that holds for years from one that drops your frame at 3am. Follow this exact process every time.
- Weigh your item. Use a kitchen or postal scale. Include the frame, glass, and hanging hardware — not just the print.
- Choose strips with a buffer. Select a product rated at least 20–30% above your item’s weight. If your frame weighs 10 lbs, use large strips rated for 12–16 lbs.
- Clean the wall with isopropyl alcohol (70%+). This removes dust, grease, and invisible residue that destroys adhesion. Let the surface dry completely — at least 1 minute.
- Separate and click the strip sets together (picture hanging strips only — the two pieces must be pressed together before applying).
- Press the strip set firmly to the back of your item. Hold for 30 seconds.
- Remove the red liner and press the item to the wall. Press each strip for 30 seconds. Apply pressure across the full surface of each strip, not just the center.
- Pull your item away from the wall. Separate the strips at the interlocking point.
- Wait 1 hour before rehanging. The adhesive needs time to reach full bond strength. Do not skip this step.
- Press the item back onto the strips. You’ll feel and hear the strips click back together.
How Much Do Common Household Items Actually Weigh?
Most renters guess their item’s weight — and usually guess low. Here are real-world weights to calibrate your strip choice.
| Item | Typical Weight Range | Recommended Strip Size |
|---|---|---|
| Small photo print (8×10, basic frame) | 0.5 – 1 lb | Small strips |
| Medium canvas print (16×20) | 2 – 4 lbs | Medium strips |
| Framed wood or metal art (18×24) | 5 – 9 lbs | Large strips |
| Large framed artwork with glass (24×36) | 10 – 16 lbs | XL / Heavyweight strips |
| Small decorative mirror (12×18) | 3 – 7 lbs | Large strips |
| Medium bathroom mirror (20×24) | 8 – 15 lbs | XL strips — verify weight first |
| Large mirror (30×40+) | 15 – 30+ lbs | Exceeds Command capacity — use traditional mounting |
| Floating shelf (empty, small) | 2 – 5 lbs | Large strips — add shelf load to strip rating |
| Towel (wet) | 1 – 2 lbs | Medium hook |
For larger wall decor that pushes the limit, explore floating shelves without drilling — systems designed to hold significantly more weight without adhesive strips.
5 Factors That Reduce Command Strip Hold (And How to Fix Them)
| Problem | Impact on Hold Strength | Fix |
|---|---|---|
| Skipping alcohol wipe | Up to 40% reduction | Always clean with 70%+ isopropyl alcohol before applying |
| Applying in cold temperatures (<50°F) | Up to 50% reduction | Warm the wall and strips to room temp before application |
| Textured or rough wall surface | 30–60% reduction | Use more strips than recommended, reduce item weight |
| Not waiting 1 hour to hang | Significant early failure risk | Always wait the full curing window after application |
| High humidity (steam, showers) | 20–40% reduction over time | Use Command Bath/Outdoor strips rated for moisture |
How to Remove Command Strips Without Damaging Your Walls
Removal is where most renters make the critical mistake. Pulling a Command strip straight out from the wall — rather than along it — is what causes paint to peel.
- Remove the item from the strips first (separate at the interlocking point).
- Find the pull tab at the bottom edge of the strip.
- Pull the tab slowly and steadily straight down, keeping the tab flat against the wall as it stretches. Think: peel downward, not outward.
- The strip will stretch and release cleanly. This takes 10–20 seconds per strip — don’t rush it.
- If a strip snaps before releasing, use dental floss or a credit card to gently work behind it, then use a small amount of rubbing alcohol to dissolve any residue.
For a deeper walkthrough including repair steps if things go wrong, see our full guide on how to remove Command strips without damaging walls.
Command Strips vs Other No-Damage Hanging Methods
| Method | Max Weight | Best For | Renter Safety | Reusable? |
|---|---|---|---|---|
| Command Picture Strips | Up to 16–20 lbs | Frames, canvas, lightweight art | Excellent | No (single use) |
| Adhesive putty (Blu-Tack) | Under 1 lb | Posters, paper prints only | Good | Yes |
| Tension rods (vertical) | 5–20 lbs depending on system | Shelves, curtain systems, display grids | Excellent | Yes |
| Peel-and-stick hooks (generic) | 1–5 lbs | Lightweight organizers, bags | Variable | No |
| Over-door organizers | 5–30 lbs | Heavy storage, pantry organizers | Excellent | Yes |
| Nails (traditional) | Unlimited (with proper anchor) | Heavy art, mirrors, shelves | Lease-dependent | N/A |
For a full comparison of renter-safe systems across different use cases, see our guide to hanging art without nails.
Command Strips and Your Security Deposit: What Landlords Look For
Command strips are specifically marketed as damage-free. When used correctly on compatible surfaces, they typically leave no mark. However, a few scenarios create deposit risk:
- Flat/matte paint: These finishes are more prone to pulling off with the adhesive than eggshell or semi-gloss. Test in a closet first.
- Overloaded strips: When strips fail under excess weight, the sudden drop can dent walls, crack frames, or damage floors.
- Improper removal: Pulling outward (instead of along the wall) causes the majority of paint peel complaints.
- Leaving strips too long: Adhesive can bond more permanently over months or years, especially in warm apartments.
Best practice: document your walls with timestamped photos before and after any Command strip use. This protects you in any deposit dispute. For more renter protection tips, read our article on apartment decor mistakes that cost your deposit.
🏠 New to renting? Get our full deposit-safe decorating checklist.
See the Checklist →Frequently Asked Questions About Command Strip Weight Limits
What is the maximum weight Command strips can hold?
The maximum weight Command strips can hold is 20 lbs using the XL Heavyweight picture hanging strips in a 4-pair configuration on smooth, clean, painted drywall. Standard large strips hold up to 16 lbs. These figures represent manufacturer-tested maximums under ideal conditions — real-world capacity is typically lower on textured, matte, or humid surfaces.
Can Command strips hold a 10 lb frame?
Yes — large Command picture hanging strips (4 pairs) are rated for up to 16 lbs, so a 10 lb frame falls comfortably within range. Clean the wall with isopropyl alcohol, wait 1 hour before hanging, and press each strip firmly for 30 seconds to reach the full rated hold strength.
Do Command strips work on textured walls?
Command strips have significantly reduced adhesion on textured walls (orange peel, knockdown, or heavy stipple finishes). On lightly textured surfaces, you can compensate by using more strips and keeping the load well below the stated limit. On heavily textured walls, Command strips are not reliable — consider adhesive hooks with a flat plate base, or alternative no-damage hanging methods for textured walls.
Why did my Command strip fall off the wall?
Command strips fail most commonly due to: skipping the isopropyl alcohol wipe before application, applying in temperatures below 50°F, hanging on matte or fresh paint, exceeding the weight limit, or not waiting the full 1 hour curing period before hanging. High humidity in kitchens and bathrooms also degrades standard Command adhesive over time — use Command Bath products in wet areas.
How many Command strips do I need for a heavy frame?
Use the number of pairs that puts your item’s weight in the bottom 70% of the rated capacity. For a 12 lb frame: large strips (rated 16 lbs) with 4 pairs works. For a 16 lb frame: use XL strips rated for 20 lbs. Never operate at 100% of stated capacity on wall surfaces — always leave a safety margin.
Can Command strips hold a mirror?
Command strips can hold lightweight decorative mirrors under 16 lbs when using large or XL strips correctly. For any mirror over 15 lbs, or mirrors in locations where falling could cause injury, use traditional wall anchors. A falling mirror is a safety hazard — weight limits for mirrors should be treated more conservatively than for canvas prints or photo frames.
Will Command strips damage my apartment walls?
When applied to smooth, eggshell or semi-gloss painted walls and removed correctly (pull tab stretched slowly down along the wall surface), Command strips are designed to leave no damage. The main risk is on flat/matte paint finishes, freshly painted walls, or wallpaper. Always test in a hidden area first and document wall condition with photos before and after use.
The Bottom Line: Command Strips Weight Limits in Practice
Command strips are one of the best tools in a renter’s toolkit when matched correctly to the task. Choose the right size for your item’s actual weight (not your guess), clean the surface properly, wait the curing time, and remove slowly. Done right, they hold reliably and leave no trace. Done wrong — wrong surface, too much weight, or ripped straight off — they become an expensive deposit problem.
For more ways to decorate without risk, start with our no-damage wall decor ideas guide or explore studio apartment decor ideas that protect your deposit.