Introduction on Small Balcony Upgrades
If you’re renting, your outdoor space probably looks like this: concrete floor, metal railing, zero personality. The good news? You don’t need drills, permanent fixtures, or landlord approval to transform it. The smartest small balcony upgrades in 2026 focus on no-damage planters, railing boxes, freestanding privacy screens, and renter-safe décor that instantly adds greenery, warmth, and function — without risking your security deposit. With the right layout and vertical styling strategy, even the tiniest balcony can become a cozy morning coffee spot, a mini garden retreat, or a stylish extension of your living space.
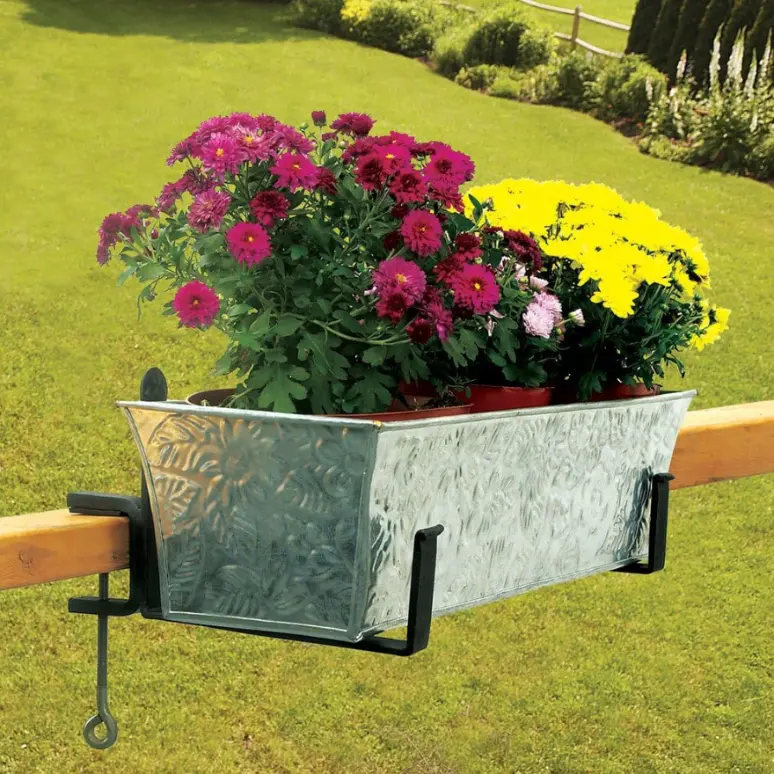
Achla Designs SFB-02C Railing Clamp Window Box Brackets (No Drill)
Turn a plain rental railing into a planter-ready setup — clamp-on support that helps hold window boxes without permanent holes.
- Best for: small balcony upgrades where you want greenery but can’t drill into rails or exterior surfaces.
- Why renters like it: clamp-style support means fully removable — ideal for security-deposit protection.
- Use it for: holding lightweight to medium window boxes and railing planters (check your planter weight + soil + water).
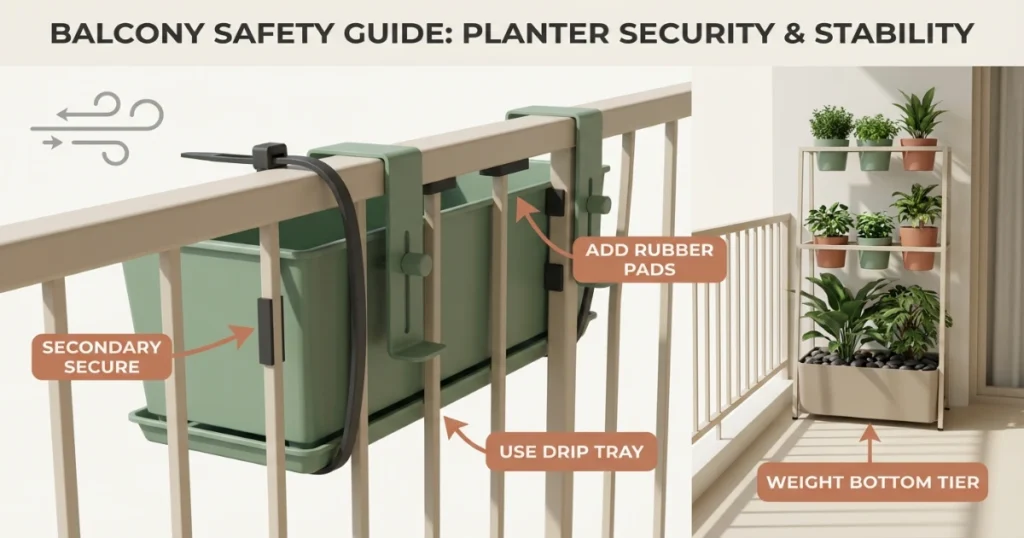
- Pro tip: add rubber pads at contact points to reduce scratching and help prevent rust marks on metal railings.
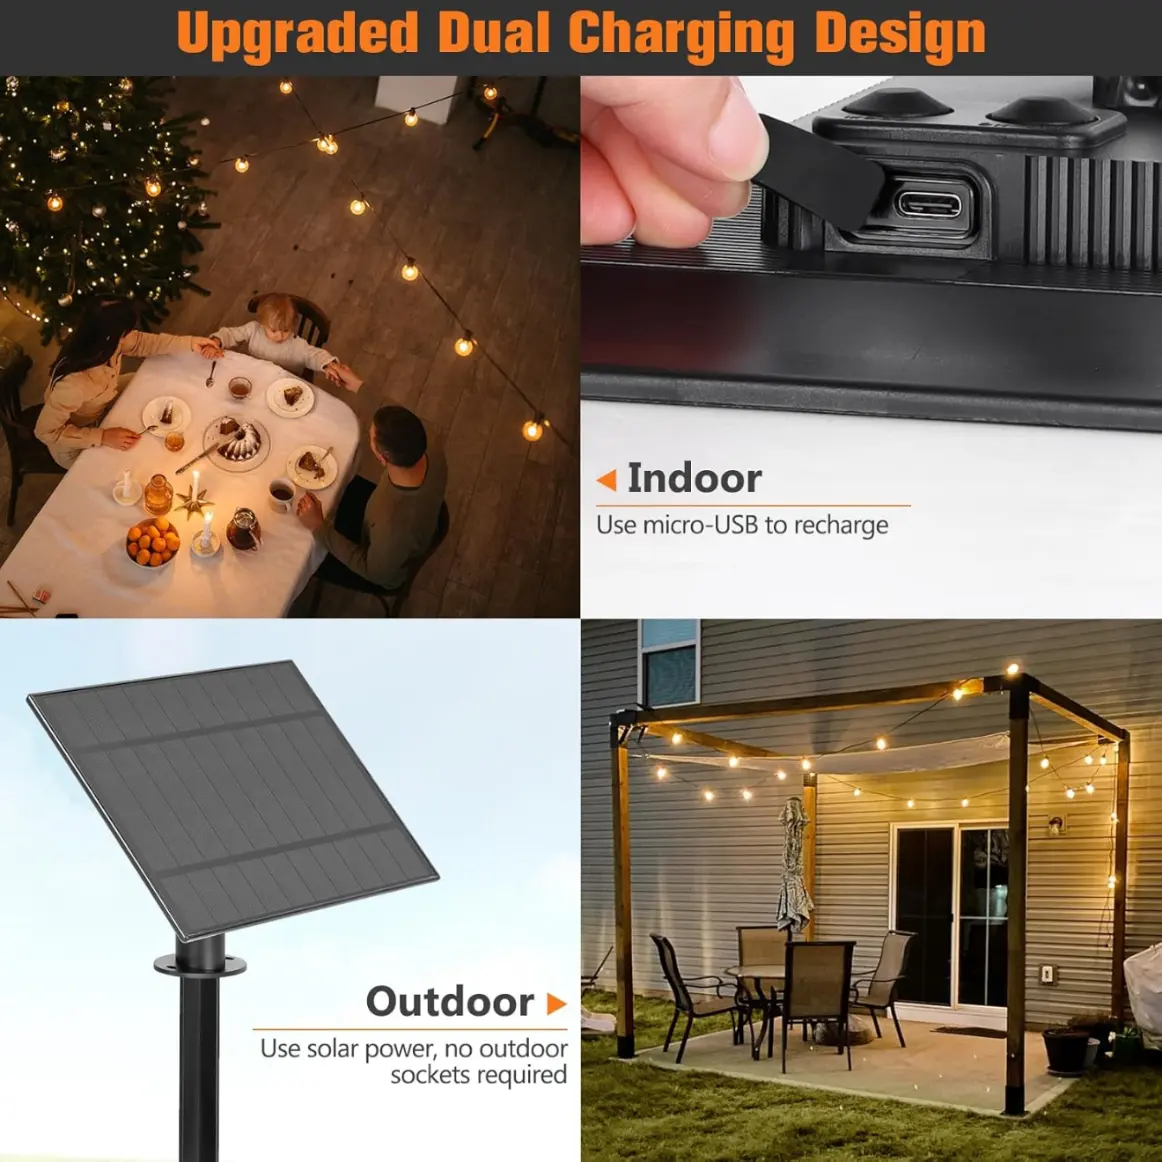
Solar String Lights Outdoor Waterproof (100ft) — Renter-Friendly Balcony Glow
One of the highest-impact small balcony upgrades: warm lighting without outlets, drilling, or landlord drama.
- Best for: instant ambiance on rentals — wrap along railing, clip to posts, or hang with removable hooks.
- Why it converts: lighting makes a balcony feel like a “real room” at night, even with minimal decor.
- Placement tip: mount the solar panel in the sunniest spot (top rail or side) for best nightly runtime.
- Renter-safe install: use UV-rated zip ties, outdoor clips, or removable hooks (no screws needed).
Disclosure: As an Amazon Associate, we may earn from qualifying purchases.
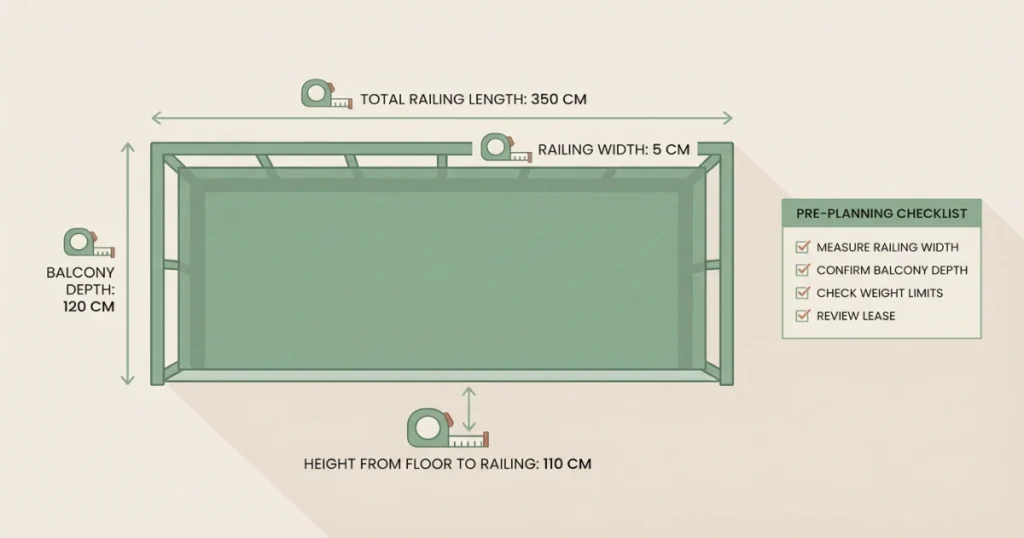
Quick Renter Balcony Checklist (Before You Buy Anything)
Before starting your small balcony upgrades, take 5 minutes to run through this checklist:
☐ Measure your railing width (in inches)
☐ Measure total railing length
☐ Confirm balcony depth (front to back)
☐ Check lease for balcony restrictions
☐ Look up local wind exposure (especially upper floors)
☐ Confirm weight limits for railing planters
☐ Plan drainage solution (drip trays or self-watering)
☐ Decide: seating-first or greenery-first layout?
Why this matters:
Most renter balcony mistakes happen before installation — not after. Measuring first prevents incompatible clamp planters, unstable setups, and unnecessary returns.
The Bare Balcony Problem Nobody Talks About
You moved in, unpacked every box, hung the curtains, and arranged the furniture exactly the way you wanted. The apartment finally felt like yours. Then you stepped outside onto the balcony and stopped.
Concrete slab. Metal railing. Maybe a dead leaf blowing around in the corner.
That was it.
You pictured what it could look like — string lights overhead, some trailing greenery along the railing, a chair and small table tucked into the corner where you could actually sit with your morning coffee. A real outdoor space, not just a fire escape with better views.
Then you re-read the lease.
“No permanent alterations.” “No drilling into exterior surfaces.” “Tenant responsible for any damage to railings, walls, or floors.”
You put the fantasy away. Seemed too risky. The security deposit alone was two months of rent. Drilling a few holes didn’t feel worth losing hundreds of dollars over, especially when you weren’t even sure you’d renew.
This situation plays out in apartments everywhere. More than 44 million households in the U.S. rent, and a growing percentage live in urban apartments under 900 square feet — where balconies are often the only private outdoor space available. At the same time, the average security deposit now equals one to two months of rent, making even minor damage a serious financial risk. That’s exactly why renter-safe balcony upgrades have become such a fast-growing category in 2026.
Renters want outdoor spaces that feel livable and personal, but lease restrictions and deposit anxiety keep them from doing anything at all. The balcony sits empty for years. Maybe you throw a single folding chair out there. Maybe you don’t bother.
Here’s the thing: you don’t need to drill anything to transform a small balcony. The market for renter-friendly outdoor products has exploded in recent years, and 2026 brings some of the best options yet. Clamp-on planters, tension-mounted privacy screens, removable lighting systems, and freestanding vertical gardens have made it genuinely possible to create a beautiful balcony setup without touching a single wall or railing with a screw.
This guide shows exactly how to upgrade your balcony without drilling, damage, or landlord drama. Whether you have a 30-square-foot balcony or a narrow juliet-style ledge, there’s a no-damage setup that works for your space, your budget, and your lease.
Key Takeaways
- Small balcony upgrades without drilling are fully achievable in 2026 using clamp, clip, and freestanding systems.
- Measure your railing width before buying any planter — compatibility is non-negotiable.
- Weight management is the most overlooked safety factor in railing planters.
- Zip ties rated for 40-plus pounds are a renter’s most versatile outdoor decor tool.
- Solar clip lights are the single highest-impact addition for ambiance with zero damage.
- Drainage management protects your relationship with downstairs neighbors.
- A livable balcony needs floor space — don’t fill every inch with plants.
- Document your balcony before and after any setup to protect your deposit.
Can You Upgrade a Small Balcony Without Drilling?
Yes. Renters can fully upgrade a small balcony without drilling using clamp-on railing planters, freestanding vertical garden systems, zip-tie privacy screens, and removable clip lighting. These methods require no tools, cause no damage, and are completely reversible — making them safe for security deposits and lease-compliant in most apartment buildings.
Why Drilling Is Risky for Renters
Most renters know drilling is “probably not allowed,” but it’s worth understanding exactly why — because the risk goes beyond just the landlord finding out.
Lease language is specific. Most residential leases include clauses about alterations to the unit. These clauses often cover exterior surfaces, railings, and balcony structures, not just interior walls. Even if the lease doesn’t spell out “no drilling into railings,” the general alterations clause likely covers it.
Waterproofing is a real concern. Balcony railings and exterior walls are often sealed or coated to prevent water intrusion. Drilling through that coating — even with a single small hole — can compromise the waterproofing and create long-term moisture problems. If a landlord discovers this during move-out, the repair cost can far exceed what a planter box was worth.
HOA and building rules add another layer. In condos and managed apartment complexes, HOA rules may restrict what can be attached to exterior railings regardless of what the lease says. Violations can result in fines charged to your landlord, who then passes them to you.
Rust and structural issues. Metal railings that get drilled into are exposed to rust at the entry point. Over time, this weakens the railing. Some buildings have strict safety codes about railing integrity, and damage — even minor — can become a liability issue.
Deposit deductions are real. The average security deposit deduction for unauthorized alterations runs between $150 and $400 depending on the repair needed. That’s a significant loss for the sake of a planter that could have hung without any hardware at all.
According to national rental housing reports, security deposit deductions for unauthorized alterations commonly range between $150 and $400 per repair, depending on surface restoration and repainting requirements. That’s far more than the cost of most no-drill balcony solutions.
The good news: none of that risk is necessary.
No-Damage Planter Upgrades for Small Balconies
This is the core of any renter-friendly balcony transformation. The right planter setup can bring color, greenery, herbs, and life to even the smallest outdoor space — all without touching the railing with anything more permanent than a clamp or a zip tie.
Railing Clamp Planters
Railing clamp planters are the most popular no-drill solution for balcony greenery, and for good reason. They work exactly as the name suggests: a bracket with adjustable clamps hooks over the top of a railing and tightens into place. No tools required in most cases, though some models come with a hand-tightening bolt.
These planters work best on standard metal or wood railings between 1.5 and 3.5 inches wide. Before you buy, measure your railing. Some clamp systems are adjustable across a wide range; others are designed for specific widths. Getting this wrong is the most common mistake first-time buyers make.
For plant selection, clamp planters are ideal for herbs like basil, thyme, and mint, as well as trailing flowers like petunias, lobelia, and sweet potato vine. These plants are lightweight when young, which matters more than most renters realize.
Weight is the critical factor. Most railing clamp planters are rated for 15 to 25 pounds when soil and water are included. Wet potting mix is heavy — a fully watered 12-inch planter can easily hit 10 to 14 pounds on its own. If you’re placing three or four along a railing, you need to think about the total load across the structure, not just per planter.
Wind safety is equally important. In higher units or exposed balconies, a filled planter hanging from a railing clamp becomes a projectile if it gets loose in strong gusts. Look for clamp systems with a secondary safety cable or strap, and make sure the clamp bolt is snug every time you check on the plants.
Pros: Easy to install, completely removable, widely available, affordable.
Cons: Limited to railing-compatible widths, weight limits require planning, may shift in high wind without secondary securing.
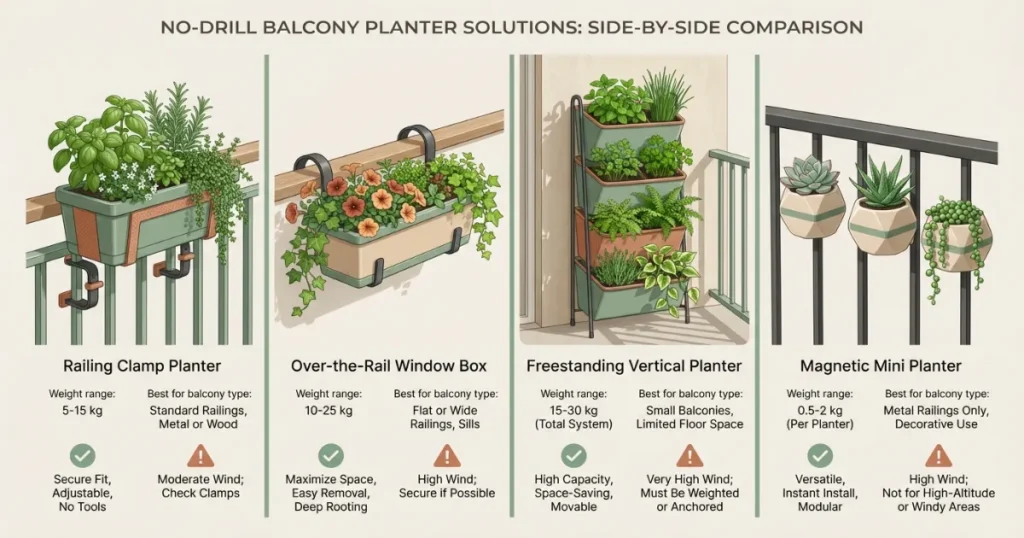
Over-the-Rail Hanging Boxes
These are longer window-box style planters that sit over the top of a railing rather than clamping to the side. They’re often U-shaped in cross-section, designed to straddle the railing and hang on both the inside and outside.
Drainage is the biggest concern here. An over-the-rail box sitting on a balcony needs to drain downward — and if your balcony has neighbors below, you have a responsibility to manage that drainage. Look for boxes with built-in drip trays or use liner inserts that allow you to control where water goes. Some renters route a small tube from the drainage hole into a discreet catch container.
Rust prevention matters here, too. If water sits in or around the contact point between a metal railing and a hanging planter, rust can develop on the railing over time — which is exactly the kind of damage that gets charged back at move-out. Use rubber bumpers or felt pads between the planter and the railing. Most quality over-the-rail boxes include these; budget options often don’t.
Ideal balcony size: Works on balconies with at least 18 inches of depth between the railing and the wall. Too shallow and the inner arm of the box will hit the building.
Freestanding Vertical Planters
For renters with a little more floor space — even just four or five square feet — freestanding vertical planters are a game changer. These are self-supporting tower structures with multiple planting pockets or shelves stacked vertically.
A good vertical planter can hold eight to fifteen individual plants in the footprint of a single chair. That’s a meaningful amount of greenery for a small apartment balcony. They don’t attach to anything, so there’s zero railing contact and zero damage risk.
The best materials for outdoor use are powder-coated steel frames with UV-resistant fabric pockets, or solid polypropylene tower units. Avoid untreated wood in this format — outdoor moisture causes warping and splitting quickly. Terra cotta pockets are too heavy.
These systems work especially well for herbs, succulents, small leafy greens like lettuce and spinach, and compact flowering plants. If you’ve thought about growing some of your own food on your balcony, a vertical planter is the most practical way to do it in a small space.
Climate consideration: In very windy locations, even a freestanding planter can tip over when fully loaded with soil and plants. Place it against a wall rather than in the center of the balcony, and fill lower pockets first to keep the center of gravity low.
Self-Watering Compact Planters
Self-watering planters have a reservoir at the base that wicks moisture up to the root zone as needed. For renters who travel, work long hours, or simply forget to water, these are practical in ways that go beyond decoration.
They’re available in railing-clamp and freestanding formats. The internal reservoir means less frequent watering and less overflow — which reduces the dripping-on-neighbors problem considerably.
Look for units with a visible water level indicator. Refilling the reservoir every five to seven days is typical in warm weather.
Magnetic or Suction Planters
These work exclusively on metal railings or glass balcony panels. Industrial-grade outdoor magnets can hold small to medium planters against a flat metal surface without any drilling. Suction systems work similarly on smooth glass or powder-coated surfaces.
They’re not suitable for every railing type, and they’re genuinely weight-limited — most hold two to five pounds maximum, making them ideal for small succulents, air plants, or shallow herb starters rather than full-grown flowering plants.
When they work, they’re remarkably clean-looking. When they don’t work — wrong railing material, too much weight, or surface texture that prevents proper suction — they fail completely. Test with an empty planter before adding soil.
Renter-Friendly Balcony Railing Upgrades
Planters transform the look of a balcony, but railing upgrades bring it to the next level — adding privacy, ambiance, and structure without a single screw.
Privacy Screens Without Drilling
Privacy is one of the top things renters want from a balcony and one of the hardest to achieve without modification. Three no-drill approaches actually work.
Zip-tie mesh screens involve attaching outdoor privacy mesh — the kind used for construction site fencing — to a railing using UV-resistant black zip ties. Thread the ties through the mesh and around the railing bars. This takes about 20 minutes and creates a solid privacy barrier. When you move, cut the ties and the railing is untouched. The mesh itself costs between $15 and $40 for a 6-foot by 4-foot panel.
Outdoor fabric wraps are panels of weather-treated canvas or polyester that tie, clip, or wrap around railing posts. Some come with built-in grommets and bungee cord loops for easy attachment and removal. They’re a softer aesthetic than mesh and come in neutrals, stripes, and patterns that look intentional rather than improvised.
Bamboo roll panels attach with zip ties or twist ties and offer a natural, resort-like look. They’re the most visually appealing of the three options and reasonably priced. The main drawback is durability — bamboo panels exposed to direct sun and rain degrade within two to three seasons. Treat them with outdoor wood sealer to extend their life.
Solar Clip Lights
String lights are the single most transformative element you can add to a balcony, and solar clip lights eliminate the need for any electrical connection or drilling.
Modern solar clip lights attach to railing tops using spring-loaded clips — the same principle as a binder clip. They charge during the day and automatically turn on at dusk. Quality matters here: cheap solar lights often fail within one season. Look for lights with a stated weather resistance rating of IP44 or higher.
For longer strands, you can clip the solar panel portion to the railing in the sunniest spot and drape the light string wherever you want it. No anchoring required.
Removable Trellis Panels
A freestanding trellis — a lattice or grid frame that stands on its own feet — can lean against a railing wall or balcony exterior without any attachment. Add climbing plants like small-variety clematis, morning glory, or fast-growing nasturtium, and within one growing season you have a lush vertical garden wall.
These panels are available in powder-coated steel, weather-treated wood, and recycled plastic composite. Steel is the most durable and holds its shape best in wind.
Cable-Tie Decor Tricks
Zip ties and cable ties are arguably the renter’s most useful outdoor decor tool. They’re UV-stabilized, weatherproof, strong enough for meaningful loads when doubled or tripled, and completely reversible.
You can use them to attach: bamboo privacy screens, wind chimes (using two ties in a figure-eight pattern around a railing bar), small decorative lanterns, herb-pocket wall panels, and shade cloth for afternoon sun protection.
The key is using the correct rating. Standard zip ties rated for 40 to 50 pounds (the kind found in electrical supply sections rather than the thin household variety) are reliable for outdoor balcony use. Always use two ties per attachment point for redundancy.
Step-by-Step Balcony Makeover Plan
Here’s how to put it all together.
Step 1: Measure your railing. Get the width of the railing bars (for clamp fit), the total railing length, and the height from balcony floor to railing top. These three numbers determine what fits.
Step 2: Check weight limits. Most residential balconies are rated for 40 to 60 pounds per linear foot, but railings themselves are often rated lower. A general safe guideline for railing-mounted items is no more than 15 to 20 pounds per railing panel. When in doubt, stay under it.
Step 3: Choose your planter type. Use the railing width measurement to confirm clamp compatibility. If your railing is non-standard, shift to a freestanding vertical setup instead.
Step 4: Test the fit before filling. Set up empty planters and screens first. Make sure clamps seat flush, over-rail boxes don’t wobble, and vertical stands are stable on your balcony floor surface.
Step 5: Secure for wind. Add secondary zip-tie safety loops to clamp planters. Weight the base of freestanding units with stones or a heavier potting mix in the bottom tier. Anchor any lightweight decorative items.
Step 6: Add lighting. Attach solar clip lights along the railing top after planters are placed, choosing the sunniest clip position for the solar panel. Drape the strand to where you want the light.
Step 7: Final safety check. Shake each planter firmly. Walk the railing and check that nothing feels loose. Look at the setup from the neighboring balcony angle to confirm nothing overhangs their space.
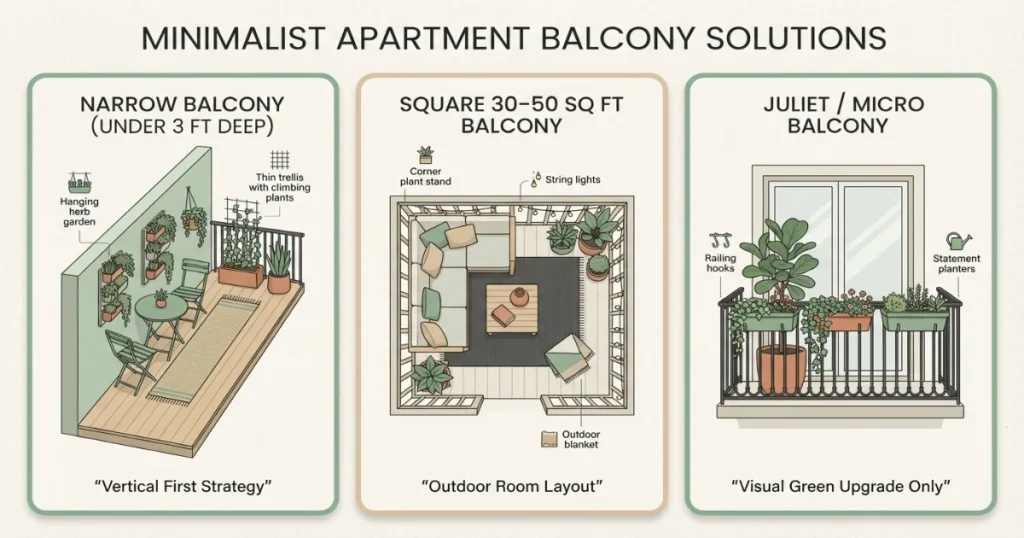
Visual Balcony Layout Examples (No-Drill Setups)
Not every balcony is shaped the same. Here are three renter-safe layout strategies based on size and depth.
Layout 1 :The Narrow Apartment Balcony (Under 3 Feet Deep)
Best For: Long, slim balconies in city apartments
Goal: Keep floor space clear while adding vertical greenery
Setup Description:
- 3–4 railing clamp planters evenly spaced across railing
- Solar clip lights along the top rail
- One slim folding chair (placed at far end)
- Small vertical herb tower tucked against wall
- Zip-tie privacy mesh along inner railing bars
Layout 2: The Square 30–50 Sq Ft Balcony
Best For: Standard apartment balconies
Goal: Create a defined “outdoor room” feeling
Setup Description:
- Two over-the-rail window boxes on front railing
- Freestanding vertical planter placed in back corner
- Bamboo privacy panel zip-tied along one side
- Compact outdoor rug (not touching exterior walls permanently)
- Small bistro table + two foldable chairs
- Solar string lights clipped along top rail
Layout 3: The Juliet or Micro Balcony (Minimal Depth)
Best For: Very shallow balconies or standing-only ledges
Goal: Maximize visual greenery without adding weight
Setup Description:
- Lightweight magnetic or suction herb planters (if compatible)
- One slim over-rail planter with drip tray
- Solar micro clip lights
- Decorative wind chime secured with dual UV-rated zip ties
- No floor items (maintains safety clearance)
Safety and Wind Checklist
Before you call your balcony setup complete, run through this list.
- Confirm each planter’s rated weight capacity and verify your actual load doesn’t exceed it.
- Check local wind ratings for your area and add secondary securing for anything rated below 35 mph if you’re in a gusty climate.
- Ensure drainage from every planter is directed away from neighbors below.
- Inspect all metal components for rust potential at railing contact points — add rubber padding where needed.
- Confirm nothing overhangs the railing edge toward the street or neighboring units.
- Check that privacy screens don’t restrict your building’s fire escape access requirements.
- Re-tighten all clamp bolts monthly during the growing season.
Common Mistakes Renters Make
Buying planters before measuring the railing. This is the number-one mistake. Clamp systems are railing-specific. A planter that works on a 2-inch round railing will not work on a 3-inch square one.
Ignoring total weight. Renters often focus on individual planter weight and forget that three or four planters add up fast. Wet soil is significantly heavier than dry — sometimes by 40 percent.
Choosing low-quality zip ties. Thin household zip ties fail in UV exposure and heat. Outdoor-rated, UV-stabilized ties in the 40-pound range are worth the small price difference.
Skipping drainage management. Water dripping onto a downstairs neighbor’s balcony is a quick way to create a real conflict. Drip trays, liners, and drainage routing take five minutes to set up and prevent a lot of headache.
Placing items that can become projectiles. Lightweight decorative items that look harmless in calm weather become dangerous in a 40-mph gust. Anything on a balcony above ground level needs to be properly weighted or secured.
Not checking lease specifics before starting. Even no-damage setups can occasionally conflict with specific building rules. A quick read of your lease addendum about balcony use takes ten minutes and could prevent a letter from building management.
Overloading a small balcony. It’s tempting to fill every inch, but a crowded balcony is hard to enjoy. Leave enough floor space for a chair. The goal is a livable outdoor room, not a storage unit with plants.
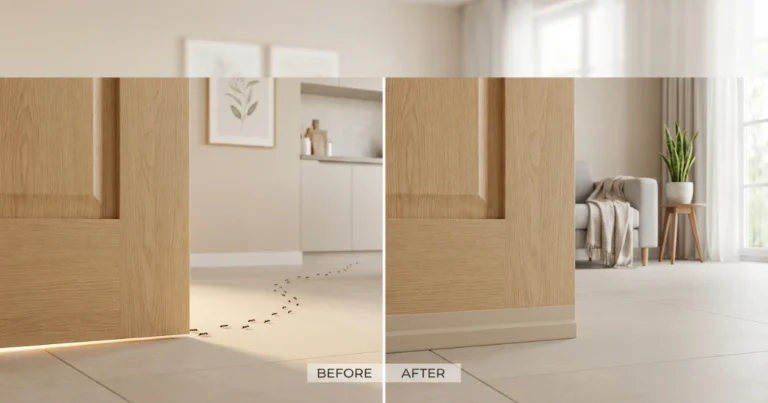
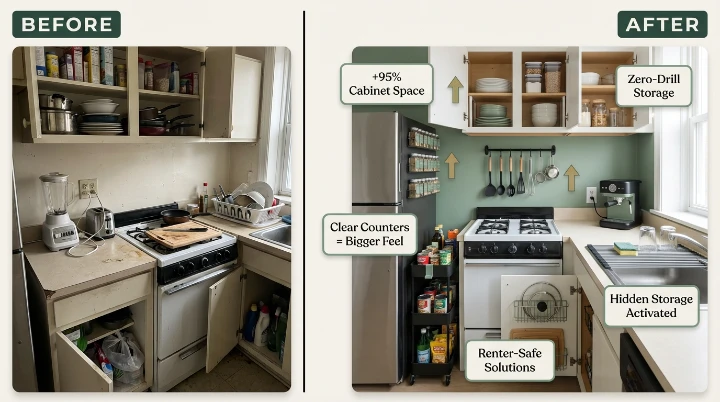
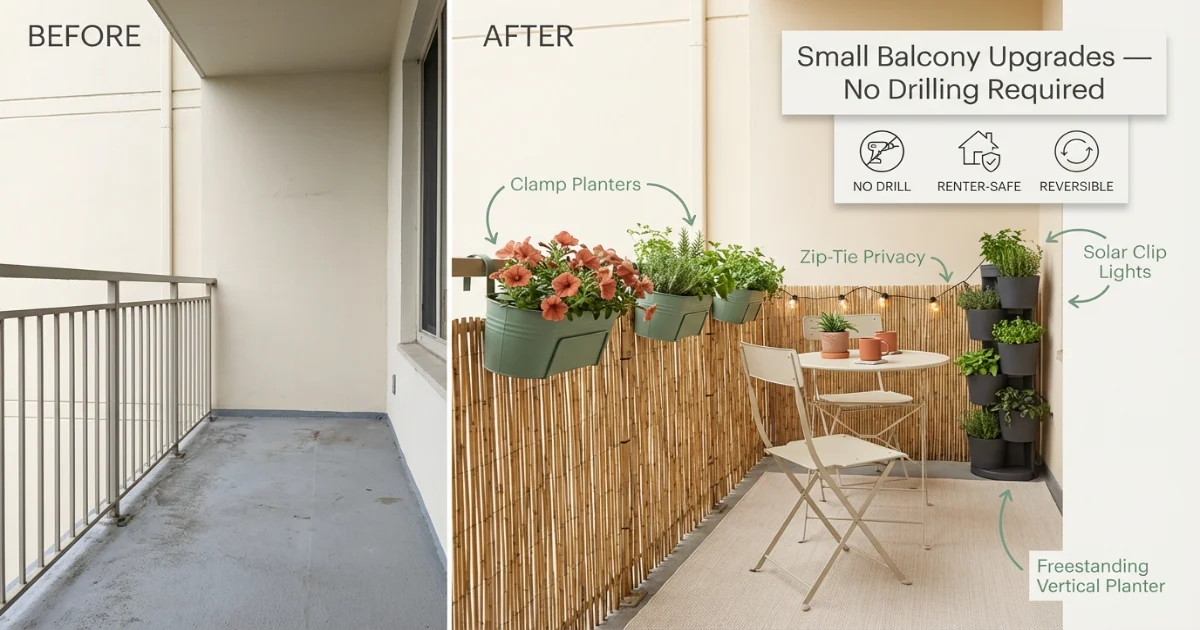
Before vs After: What a No-Drill Balcony Upgrade Really Changes
Let’s make this practical.
Here’s the difference between an untouched rental balcony and a renter-safe upgraded setup.
BEFORE: The Empty Rental Balcony
- Bare concrete floor
- Exposed metal railing
- No privacy from neighbors
- No lighting after sunset
- Zero greenery
- Feels like overflow space, not living space
- Used rarely — maybe once a week
Psychological effect:
It feels unfinished. Temporary. Not yours.
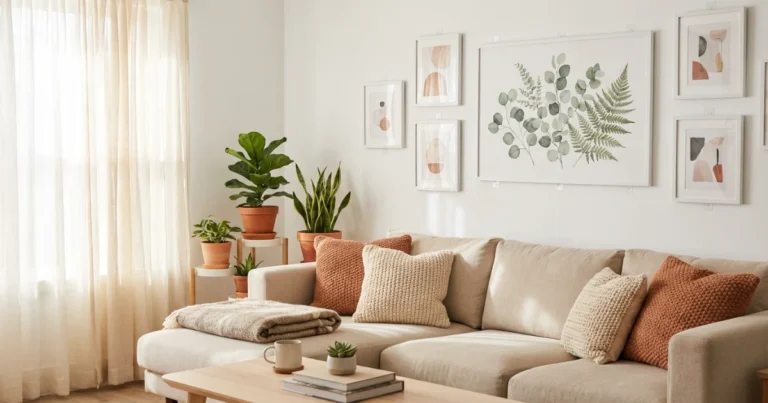
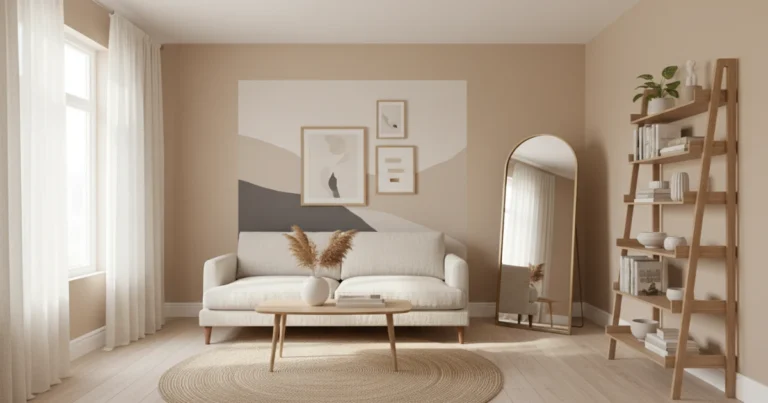
AFTER: The No-Damage Balcony Setup
- 3 railing clamp planters with trailing greenery
- Solar clip lights lining the top rail
- Bamboo privacy panel secured with UV-rated zip ties
- Slim vertical herb tower in corner
- Foldable bistro chair + compact outdoor rug
- Controlled drainage with drip trays
Psychological effect:
It feels intentional. Calm. Functional. A real extension of your apartment.
What Actually Changed?
You didn’t drill.
You didn’t alter the structure.
You didn’t violate the lease.
You didn’t risk your deposit.
You simply used:
- Clamp systems
- Freestanding structures
- Zip-tie attachments
- Solar lighting
That’s the entire strategy behind smart small balcony upgrades in 2026.
The ROI of a Balcony Upgrade
For $100–$250, you gain:
✔ A daily-use coffee spot
✔ A stress-reduction green space
✔ Evening ambiance
✔ Privacy from neighbors
✔ Added perceived apartment value
That’s an extremely high return for zero structural risk.
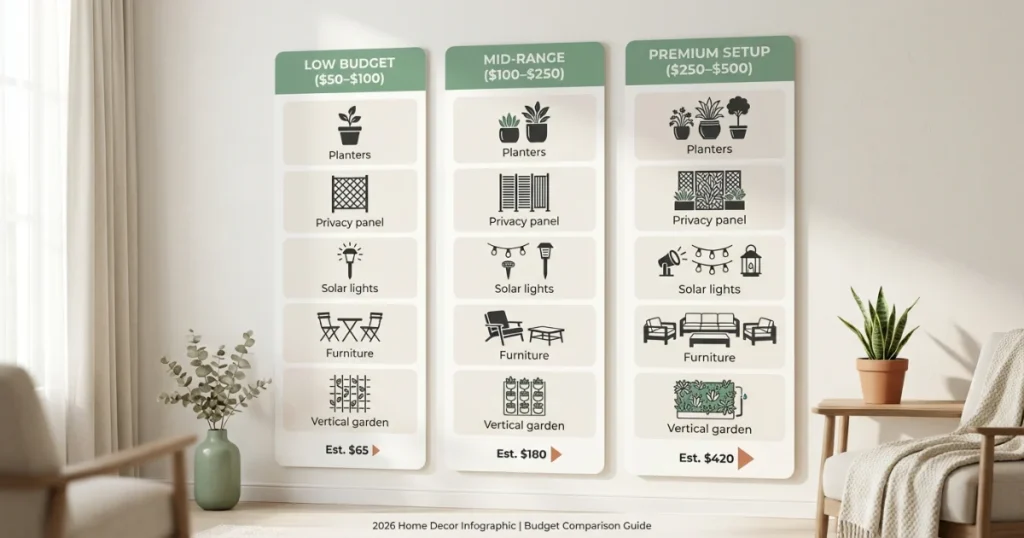
Cost Breakdown
Low budget: $50–$100
At this tier, you can outfit a small balcony with two to three railing clamp planters ($15–$25 each), a set of solar clip lights ($20–$35), and a zip-tie privacy mesh panel ($15–$30). The result is functional, green, and genuinely pleasant. Buy plants from a local nursery or grocery store to save money.
Mid-range: $100–$250
This budget gets you a full railing planter setup, a freestanding vertical planter or over-the-rail window boxes with drip liners, a bamboo or fabric privacy screen, quality solar lights, and a small folding side table. The balcony starts to look considered and cohesive at this level.
Premium renter setup: $250–$500
At this tier, you can add a full self-watering vertical tower, high-quality weather-treated furniture, layered lighting (solar string lights plus a standalone solar lantern), premium bamboo or powder-coated steel trellis panels, and a coordinated planter color scheme. This is a balcony that genuinely impresses — and packs down completely when you move.
FAQ: Small Balcony Upgrades Without Drilling
Can I hang planters on apartment balcony railings?
Yes, in most cases. Railing clamp planters and over-the-rail hanging boxes are designed specifically for this and cause no damage to the railing. The key is matching the planter’s clamp width to your specific railing dimensions and staying within safe weight limits. Always check your lease for any balcony-specific restrictions before setting anything up, and use rubber padding between the planter hardware and the railing to prevent scratching or rust.
Are clamp planters safe in wind?
Clamp planters are generally safe in moderate wind when installed correctly and within their weight capacity. The risk increases in high-wind environments or upper floors. To improve wind safety, add a secondary zip-tie or bungee connection from the planter to a railing bar below the top rail. Fill planters with lighter-weight potting mix rather than heavy garden soil. In areas prone to sustained wind above 35 mph, bring planters inside during storms.
How much weight can balcony railings hold?
This varies by building construction and railing material, but a common engineering guideline is that residential railings are designed to withstand a 200-pound lateral load at the top — meaning horizontal pressure, not hanging weight. For hanging weight from the top of the railing, a practical safe limit used by most product manufacturers is 15 to 25 pounds per clamp point. If you’re unsure, contact your building manager or property management company for specifications.
Can landlords forbid balcony decor?
Yes, landlords can include restrictions on balcony use in lease agreements. These restrictions might cover items like satellite dishes, grills, clothing hung to dry, or anything that attaches to the exterior. However, landlords generally cannot prohibit all personal use of a private balcony. Read your lease carefully for any balcony addendum, and if something is unclear, ask your landlord in writing so you have a record of the answer.
What is the safest no-drill privacy solution?
For most renters, zip-tie mesh panels offer the best combination of privacy, safety, and reversibility. The mesh attaches directly to existing railing bars using UV-rated zip ties, applies no bending load to the railing, and takes less than 30 minutes to install or remove. Bamboo roll panels look better but degrade faster outdoors. Fabric wrap systems work well on post-style railings but may be limited on bar-grid styles.
Do railing planters cause rust?
They can, if metal contacts metal without a barrier. The solution is simple: use rubber bumpers, silicone pads, or adhesive felt strips between any planter hardware and the railing surface. Most quality railing planters include these. If yours doesn’t, purchase a small pack of self-adhesive rubber bumpers — they cost under $5 and prevent a potential deposit deduction.
How do I stop water dripping onto neighbors below?
Use planters with built-in drip trays, or add a separate tray beneath any planter that doesn’t have one. For over-the-rail boxes, insert a plastic liner with a drainage tube and route it into a small catch reservoir. Water your plants slowly and in smaller amounts so the soil absorbs it before overflow occurs. Self-watering planters with reservoir systems are the most neighbor-friendly option because they absorb moisture from below rather than draining excess downward.
Are zip ties strong enough for balcony decor?
Yes, when you use the right type. Standard thin zip ties are not suitable — they fail quickly in UV exposure and heat. Look for zip ties labeled as UV-stabilized and rated for 40 to 50 pounds. For heavier items like bamboo panels, use two ties per attachment point. Check them at the start of each season and replace any that show brittleness or discoloration. High-quality outdoor zip ties are the same type used in marine and electrical work and hold up reliably for years.
Final words on Small Balcony Upgrades
Make Your Balcony Yours — Safely
You don’t have to choose between a beautiful outdoor space and protecting your deposit. The no-damage balcony products available in 2026 are practical, durable, and genuinely attractive — a far cry from the jury-rigged solutions renters had to make do with a decade ago.
Start small if you’re unsure. One set of clamp planters and a strand of solar lights can change how a balcony feels completely. Once you see what’s possible, you can build from there — adding privacy screens, a vertical garden, or a full coordinated setup — all without ever picking up a drill.
Your balcony is part of your home. It deserves the same care and attention as every room inside.