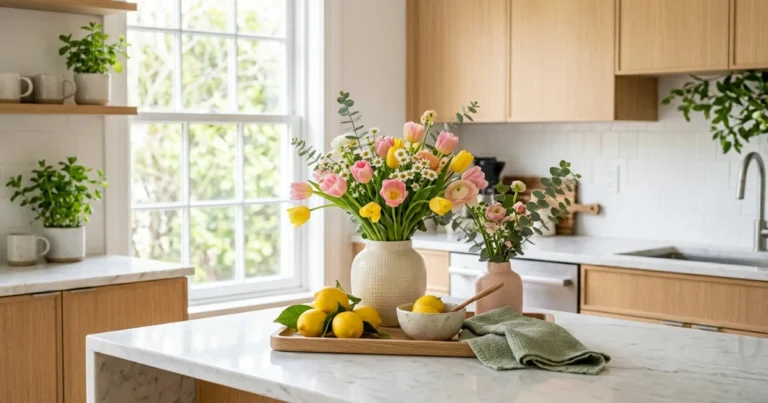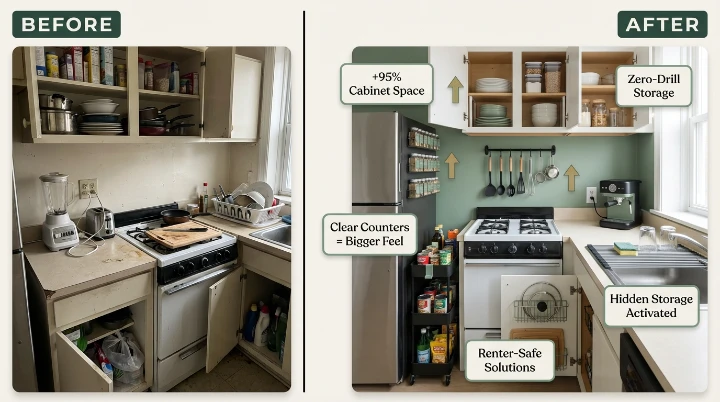
You moved in, unpacked your plates, and then stood in your kitchen realizing there’s nowhere to put anything. The cutting board lives on the stove. The blender blocks the only outlet. The cabinet holds six things — none of which you actually need daily and this reuslts in you need some tiny kitchen hacks.
Sound familiar? You’re not imagining it. Average US apartment sizes have been shrinking steadily, with new units averaging just 887 square feet — and the kitchen is usually the first casualty. A 2023 RentCafe report found that apartment sizes dropped by nearly 30 square feet over the past decade. More people are cooking in less space than ever before here are small apartment decor ideas. According to National Multifamily Housing Council data, over 44 million U.S. households rent — and small kitchens are one of the top frustration points cited in renter surveys.
But here’s the thing: tiny kitchens don’t feel cluttered because they’re too small. They feel cluttered because of poor layout and wasted vertical space. That’s entirely fixable — without a drill, without your landlord’s permission, and without spending a fortune.
Every single tiny kitchen hack in this guide is no-drill, security-deposit safe, and renter-friendly furniture ideas. No fantasy Pinterest setups. No expensive renovations. Just real, practical solutions that actually work in real apartments.
Let’s get into it.

Command Jumbo Utility Hook (7.5 lb) — Zero-Drill Hanging for Tiny Kitchens
- Best use: dish towels, oven mitts, measuring cups, lightweight lids & tools
- Why it works: gets “daily clutter” off counters and into vertical space
- Renter-safe tip: press firmly for 30 seconds and wait the full cure time before loading
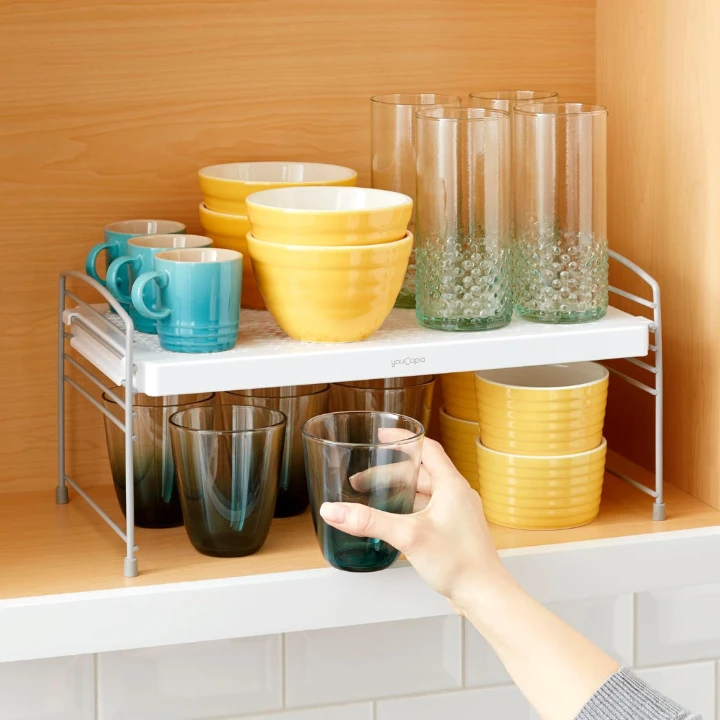
YouCopia UpSpace Adjustable Shelf Riser — Double Cabinet Space (No Tools)
- Best use: mugs + bowls, plates + small items, snacks + packets
- Why it works: eliminates wasted vertical airspace inside cabinets
- Pro tip: measure cabinet interior height first so you pick the perfect clearance
Key Takeaways
- Tiny kitchens feel small because of clutter and wasted vertical space — not actual size.
- Every hack in this guide is no-drill, deposit-safe, and renter-friendly.
- Vertical storage — fridge sides, wall rails, above-cabinet zones — is the highest-impact fix.
- Shelf risers can nearly double cabinet capacity in under 10 minutes.
- Clear countertops make the biggest visual difference of any single change.
- A $0 reset (declutter + reorganize) outperforms $200 of disorganized storage every time.
- Measure before you buy. Everything else is secondary.
Quick Tiny Kitchen Reset Checklist
☐ Clear all countertops
☐ Measure vertical wall height
☐ Measure cabinet interior height
☐ Check fridge side for magnetic storage
☐ Identify 4–6 inch gap for rolling cart
☐ Remove unused appliances
Why Tiny Kitchens Feel Smaller Than They Actually Are
The Visual Clutter Problem
When countertops are covered, your brain reads the entire room as full — even if there’s technically usable space everywhere else. Visual clutter triggers a stress response that makes a 70 sq ft kitchen feel like a closet.
The fix isn’t more storage. It’s smarter placement. Moving items off the counter and into vertical or hidden zones instantly changes how the space feels.
Dead Vertical Space Most Renters Ignore
Look up. Most renters use the bottom 18 inches of their cabinets and about two square feet of counter. Everything above cabinet height? Empty wall between upper cabinets? The sides of the fridge? All dead space.
A typical apartment kitchen has 3–5 feet of usable vertical wall space that goes completely untouched. That’s where your tiny kitchen hacks begin.

Cabinets That Waste 40% of Usable Space
Standard kitchen cabinets are about 12–14 inches tall per shelf. Most items you store — spice jars, mugs, small plates — are only 4–6 inches tall. The gap above them is pure waste.
Adding a simple shelf riser inside your cabinet can nearly double what fits. We’ll cover exactly how below.
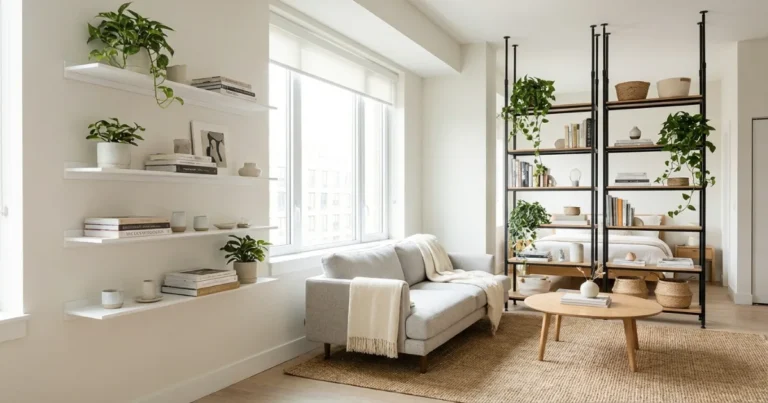
Hack #1 – Use Vertical Space Like a Designer (Without Drilling)
Vertical storage is the single highest-impact tiny kitchen hack you can implement today. It doesn’t require tools, doesn’t damage walls, and can double your effective storage area in under an hour.
Over-the-Sink Roll-Up Drying Racks
A roll-up dish drying rack that sits over the sink does something brilliant: it converts dead airspace into a functional drying zone and frees up an entire section of countertop.
These racks roll up when not in use, lie flat when drying dishes, and most are adjustable to fit sinks from 12 to 28 inches wide. Cost: $15–$30.
Stackable Counter Shelves
Stackable wire or bamboo counter shelves add a second “floor” to your countertop or inside cabinets. Put your coffee station on top, your toaster below. Put mugs on the upper tier, plates on the lower.
These are one of the most versatile small kitchen storage ideas available and cost as little as $12 on Amazon.
Magnetic Side-of-Fridge Storage
The side panel of your refrigerator is an underused goldmine. Magnetic knife strips, magnetic spice racks, and magnetic paper towel holders all attach without tools and create a mini storage wall out of thin air.
A set of magnetic spice containers plus a rail can hold 10–12 spices in a space that was previously doing nothing. Total cost: under $25.
Adhesive Wall Hooks That Actually Hold
Modern Command-style hooks have come a long way. Heavy-duty versions now hold up to 7.5 lbs per hook and remove cleanly from walls without damage.
Use them for hanging measuring cups, colanders, pot lids, and lightweight pans on wall space between cabinets. Just make sure you’re pressing them firmly for 30 seconds and waiting the recommended cure time before loading them.
Hack #2 – Double Your Cabinet Capacity in 10 Minutes
Most people open their cabinets, see a jumbled mess, and give up. But with a few cheap organizers, you can nearly double what fits — without adding a single new cabinet.
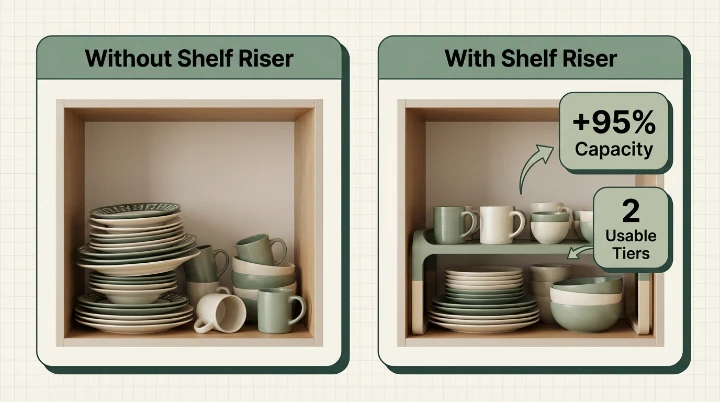
Adjustable Shelf Risers
A cabinet shelf riser splits one tall shelf into two usable levels. It’s essentially a small elevated platform that sits inside your cabinet and creates a second storage tier.
One riser turns a cabinet that held 8 mugs into one that holds 16. Cost: $8–$15 per riser.
Cabinet Capacity Before vs After Shelf Riser
Without Shelf Riser
- 1 usable tier per shelf
- 4–6 mugs per shelf
- Plates block smaller items underneath
- Around 60% of cabinet space actually used
With Shelf Riser
- 2 usable tiers per shelf
- 10–12 mugs per shelf
- Plates and bowls stacked separately
- Up to 95% of cabinet space utilized
Under-Shelf Hanging Baskets
These clip onto the bottom of an existing shelf and hang down, creating a bonus shelf for free. Hang them in cabinets to hold foil and wrap boxes, or under upper cabinet shelves to store small fruit, bread, or snack bags.
They require zero installation and come off instantly. Around $10–$18 for a set of two.
Slim Storage Bins for Deep Cabinets
Deep cabinets are notorious for swallowing items whole. Pull everything to the front, then use slim pull-out bins to organize the depth. Label the front, and suddenly your “lost zone” becomes a functional pantry.
Slim bins in the 3–4 inch width range are ideal for can goods, spice backup stock, and packets.
Pull-Out Cabinet Organizers (Renter Safe)
Freestanding pull-out cabinet organizers — the kind that don’t require screwing into cabinet floors — are one of the most underrated apartment kitchen hacks out there.
They sit on the cabinet shelf and pull forward when you need access, eliminating the need to dig through stacked items. Available in single and double-tier versions for $20–$40.
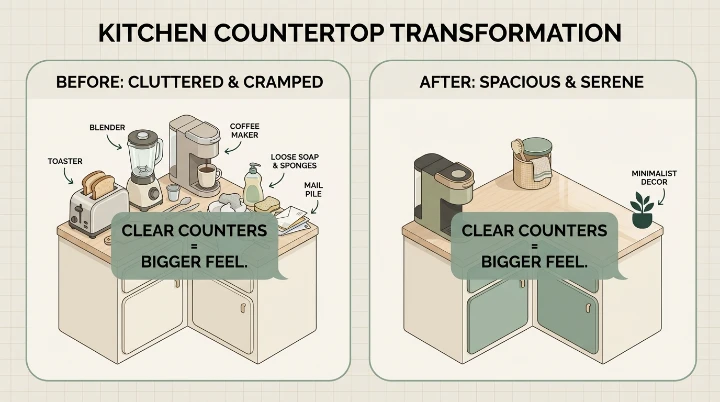
Hack #3 – Countertop Decluttering That Makes Your Kitchen Look Bigger
This is the hack most people resist the most — and the one that makes the biggest visual difference. Clear countertops make a tiny kitchen feel 30% larger instantly.
The “One Appliance Rule”
Keep only one appliance on your counter at all times. Everything else lives in a cabinet, on a shelf, or in a closet.
This might sound radical if you’re used to seeing your coffee maker, toaster, blender, and air fryer all lined up — but rotating appliances in and out based on what you’re actually using is a game-changer for renter kitchen organization.
Hide Daily Items in Decorative Bins
Items you use every day — dish soap, a sponge, hand towels — still need to be accessible. But they don’t need to be loose on the counter.
A small decorative bin corrals them into a tidy footprint. It reduces visual noise dramatically while keeping everything within reach. Woven, ceramic, or matte baskets work best aesthetically.
Wall-Mounted Paper Towel Alternatives
A freestanding paper towel holder takes up a circular footprint of about 4–6 inches in diameter on your counter. A magnetic or adhesive wall-mounted version takes up zero.
This is a tiny kitchen hack that costs $8 and takes two minutes. It’s one of the easiest swaps you can make.
Foldable Prep Surfaces
A wall-mounted fold-down prep table or an over-the-sink cutting board can add 3–5 square feet of workspace when you need it and disappear completely when you don’t.
Over-the-sink boards are particularly clever — they expand your workspace without occupying any floor or counter space at all.
Hack #4 – Hidden Storage Most People Never Think About
Beyond the obvious cabinet-and-counter zones, there are several storage areas in every kitchen that almost nobody uses.
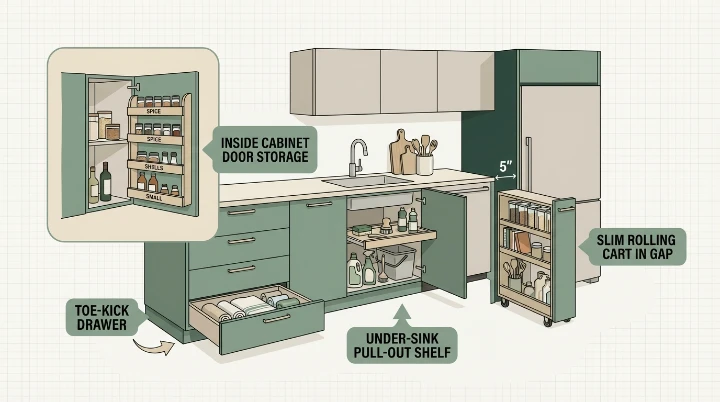
Inside Cabinet Door Storage
The inside face of every cabinet door is usable storage space. Adhesive or tension-mounted door organizers can hold spice jars, cleaning supplies, foil and wrap, cutting boards, and more.
A full set of inside-door organizers can add the equivalent of one full shelf of storage to your kitchen. No drilling required — tension-mounted versions grip the door edge securely.
Toe-Kick Drawer Options
The toe-kick — that recessed space at the very base of your cabinets — is usually completely empty. In owned homes, carpenters install pull-out drawers here. For renters, there are now adhesive-mount toe-kick trays that slide in and out.
These are ideal for flat items: baking sheets, cutting boards, pizza stones, and serving platters.
Under-Sink Vertical Dividers
The under-sink cabinet is notoriously chaotic. A two-tier pull-out shelf plus a vertical tension divider on one side can triple the usable area.
Use the dividers to keep cleaning products vertical and organized, and the pull-out shelf for sponges, dish soap, and backup supplies. The whole setup costs about $30.
Rolling Slim Pantry Carts
If you have even 4–6 inches of gap between your fridge and a wall or cabinet, a rolling slim pantry cart fits perfectly and adds substantial storage.
These slim carts pull out when you need them and slide back flush with the appliance. They typically hold 50–80 lbs and cost $30–$60. One of the most popular space-saving kitchen ideas for renters with zero pantry space.
Hack #5 – Smart Renter-Friendly Wall Storage (No Damage Required)
Getting useful items on walls without drilling is easier than it’s ever been. The product category has exploded in recent years, and the quality has genuinely improved.
Heavy-Duty Adhesive Rails
Adhesive kitchen rails — like the kind used in café prep stations — now come in versions rated for 11–20 lbs. Attach them to the wall, then hang S-hooks to hold pots, utensils, and towels.
These mount with adhesive pads that remove cleanly and are rated for tile, painted drywall, and sealed wood surfaces. Cost: $20–$35 for a full kit.
Tension Rod Spice Racks
A simple tension rod installed inside a cabinet — between two walls — can hold a row of spray bottles, hanging baskets, or spice jars with loop clips.
Two tension rods create a full spice shelf inside a cabinet door gap. This is one of the best no-drill kitchen storage solutions that costs under $5 and takes 30 seconds to install.
Peel-and-Stick Floating Shelves
Modern peel-and-stick floating shelves are designed specifically for renters. They hold up to 11 lbs, come in a range of sizes from 12 to 24 inches, and remove without leaving residue.
They work best for lightweight items: spice jars, small succulent plants, recipe cards, and phone stands for hands-free cooking. At $15–$25 each, they’re one of the most renter-safe upgrades available.
Removable Backsplash with Built-In Storage
Peel-and-stick backsplash tiles aren’t just decorative — combined with magnetic strips or mounted rails, they can create a functional storage wall behind your stove that looks professionally installed.
Some kits include integrated S-hook rails and magnetic panels. They peel off cleanly and are completely landlord-safe.
Hack #6 – Make a Tiny Kitchen Feel Bigger Instantly
Once storage is optimized, a few visual tricks can make the space feel significantly larger than it is. This is where psychology meets practical design.Studies in environmental psychology show that visual clutter increases perceived room density — meaning your brain literally processes the room as smaller than it is. Clearing horizontal surfaces changes that perception instantly.
Light Reflection Tricks
Glossy backsplash tiles, a small mirror on an unused wall, and under-cabinet LED strip lights all bounce light around the kitchen, making it feel more open. The LED strips are adhesive, cost $15–$20, and plug into an outlet — no wiring required.
Clear Containers vs. Opaque
Switching from mismatched food packaging to clear, uniform containers on open shelves or inside cabinets does two things: it eliminates visual noise and lets you see what you have at a glance.
This is a small kitchen organization idea that costs $20–$40 for a starter set and pays off every single day.
Uniform Color Storage Bins
Mixing a red bin, a blue bin, and three different wooden baskets creates subconscious chaos. Switching to a single color or material throughout — all white, all black, all natural wood — makes the space read as intentional and calm.
It doesn’t require buying everything new. Even covering mismatched containers with adhesive contact paper in one color works.
Matching Hooks and Hangers
The same principle applies to hooks. A mix of silver, black, and wooden hooks on the same wall looks busy. Swapping everything to one finish — matte black or brushed nickel — makes the wall look clean and designed rather than improvised.
Which Tiny Kitchen Hacks Deliver the Biggest Impact?
Highest ROI (Biggest Impact Fastest)
- Clear Countertops (Instant visual expansion)
- Shelf Risers (Doubles cabinet capacity)
- Rolling Slim Pantry Cart (Adds full pantry in 5 inches)
Medium Impact
- 4. Magnetic Fridge Storage
- 5. Adhesive Rails
- 6. Under-Sink Pull-Out
Low Impact but Helpful
- 7. Matching Containers
- 8. LED Strip Lighting
- 9. Uniform Hooks
Tiny Kitchen Layout Examples (Visual Walkthrough)
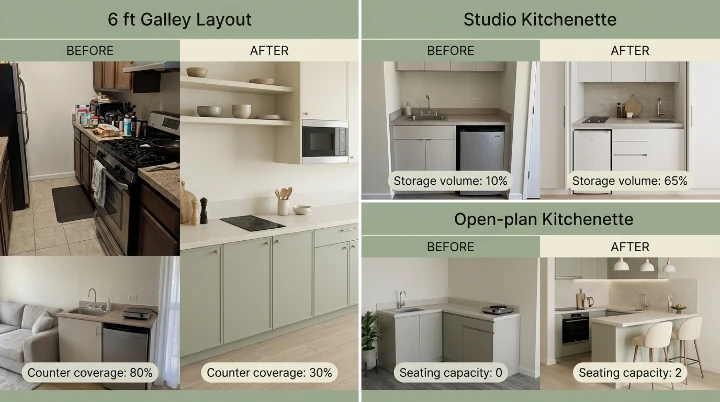
6 ft Galley Kitchen Setup
Before: cutting board on the counter, paper towels in the middle, pots stacked inside each other in one lower cabinet, nothing above the cabinets, fridge completely bare.
After: over-the-sink roll-up rack replaces the drying area, magnetic strip and spice rack on the fridge side panel, adhesive rail above the stove holds utensils, shelf riser inside the upper cabinet doubles mug capacity, rolling slim cart in the 5-inch gap beside the fridge holds dry goods.
The counter footprint drops from 80% covered to under 30% covered.
Studio Apartment Mini Kitchen
Before: portable electric burner on the only counter, no cabinet space whatsoever, everything stacked in plain sight.
After: peel-and-stick floating shelves hold spices and small items. Tension rods inside the one under-counter cabinet create hanging zones for cleaning supplies. A rolling cart serves as both pantry and prep surface. Adhesive hooks on the side wall hold pots and lids.
A studio kitchen with zero cabinets becomes fully functional with under $80 of product.
Open-Plan Kitchenette
Before: everything visible from the living room, creating a sense of constant clutter that bleeds into the living space.
After: uniform cream-colored bins corral countertop items. Clear jars replace mismatched food packaging. LED strip lights under the upper cabinets draw the eye to a clean surface rather than the storage above. Rolling cart is positioned to double as a room divider.
Tiny Kitchen Hacks for Renters on a Budget
Not everyone has $100 to drop on kitchen organization. Here’s how to approach this at every price point.
$0 hacks you can do right now:
- Remove everything from your countertops and put back only what you use daily.
- Reorganize cabinet contents by grouping like items together.
- Use the space above your cabinets for rarely-used items in a box.
- Flip your cutting board vertical in a cabinet instead of flat on the counter.
Under $25 hacks:
- Adhesive magnetic spice rack on the fridge side ($12–$18)
- Tension rod inside cabinet for spray bottles ($3–$5)
- Over-the-sink roll-up drying rack ($15–$22)
- Two shelf risers for upper cabinets ($8–$15 each)
Full mini-makeover under $100: Combine a rolling slim pantry cart ($35), two peel-and-stick floating shelves ($30), a magnetic rail kit ($25), and a set of clear stackable containers ($20). Total: approximately $110, with items available individually on sale or secondhand for under $100.
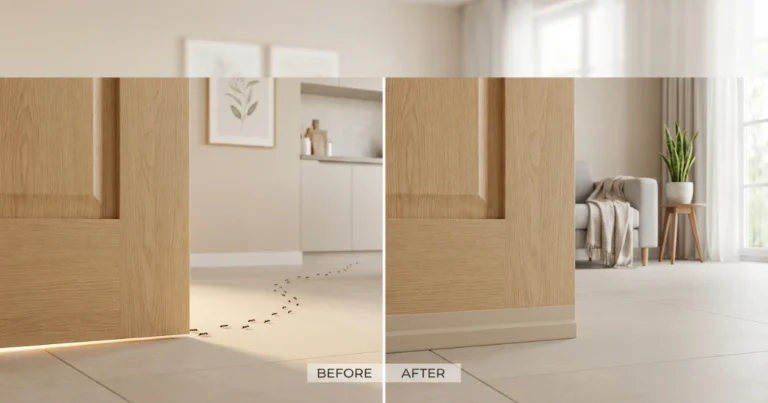
Common Tiny Kitchen Mistakes to Avoid
Overloading Walls
Adhesive products have weight limits — and exceeding them means everything crashes down, often taking paint with it. Always check the rated load, stay 20% under it, and use multiple hooks rather than one overloaded one.
Buying Storage Without Measuring
This is the most common and costly mistake. Buy a rolling cart that’s one inch too wide. Order a shelf riser that’s too tall for your cabinet. Buy a magnetic strip for a fridge that turns out not to be magnetic.
Measure twice before ordering anything. A tape measure and 10 minutes saves significant frustration.
Mixing Too Many Container Types
A wicker basket, three mismatched plastic bins, a glass jar, and a metal bucket are all containers — but together they look chaotic. Pick one or two materials and stick to them throughout the kitchen.
Ignoring Flow Between Sink–Stove–Fridge
The classic kitchen work triangle exists for a reason. Your prep area should be between your fridge and stove. Your cleaning zone should be near the sink. When storage ignores this flow — like storing pots above the fridge and the stove on the opposite wall — you create friction that makes cooking feel harder than it is.
Arrange storage to support how you actually move through the space.
Quick 15-Minute Tiny Kitchen Reset Plan
You don’t need a full weekend to transform your kitchen. Here’s a focused 15-minute reset:
Step 1 – Clear all counters completely (3 minutes). Everything goes somewhere else temporarily. Don’t organize yet — just clear.
Step 2 – Measure your vertical space (2 minutes). Height above counter to upper cabinet, gap beside fridge, inside cabinet heights. Write it down.
Step 3 – Install shelf risers inside upper cabinets (3 minutes). Group items back in — tall items at the back, short items on the riser.
Step 4 – Add two adhesive hooks near the stove (2 minutes). Hang your most-used utensils.
Step 5 – Return only essential items to the counter (3 minutes). One appliance. Dish soap in a bin. Paper towels on a wall-mount if you have one. Nothing else.
Step 6 – Group remaining items by category in cabinets (2 minutes). Baking together. Canned goods together. Snacks together.
That’s it. Fifteen minutes to a noticeably cleaner, more functional kitchen.
Want to Upgrade Further?
If you’re serious about maximizing kitchen space in small apartments, start with:
- 2 shelf risers
- 1 over-the-sink rack
- 1 rolling slim cart
Those three alone can transform a kitchen under 900 sq ft.
Even small changes compound fast.
FAQs
How do you organize a tiny kitchen without cabinets?
Focus on vertical and freestanding solutions. A rolling slim pantry cart provides significant storage in minimal floor space. Peel-and-stick floating shelves on walls hold everyday items. Magnetic rails on the fridge and adhesive hooks on any flat wall surface multiply your storage without needing a single cabinet. Clear, labeled containers on open shelves also look intentional rather than cluttered.
What is the best storage solution for small apartment kitchens?
There’s no single best solution — it depends on your specific layout. But the highest-impact combination is: shelf risers inside cabinets (doubles capacity instantly), a rolling slim pantry cart (adds a full pantry in unused gap space), and adhesive rails or magnetic strips (converts walls and fridge sides into storage zones). Combined, these three address the most common pain points in apartment kitchen space saving.
How can I make my small kitchen look bigger?
Clear your countertops first — this alone creates a dramatic visual effect. Then add LED strip lighting under upper cabinets, switch to clear or uniform-colored storage containers, and use a consistent finish for all hooks and hardware. Light reflection and visual uniformity are the two main psychological levers for making a space feel larger than it is.
Are adhesive shelves safe for renters?
Yes, when used correctly. Modern adhesive shelves are specifically designed to remove cleanly from painted drywall, tile, and other surfaces. Always stay within the weight limit, apply firmly to a clean dry surface, and follow the manufacturer’s removal instructions (usually slow, even pulling at a low angle). Avoid using them on freshly painted walls less than 30 days old.
What should I remove first in a tiny kitchen?
Start with anything you haven’t used in 30 days. Then remove duplicate tools (most people own 3+ spatulas), expired pantry items, and any appliance that lives on the counter but gets used less than weekly. A first-pass declutter typically frees up 20–30% more usable space before any organizers are added.
How do you maximize counter space in a small kitchen?
Apply the one-appliance rule: only one appliance lives on the counter at a time. Add an over-the-sink cutting board or roll-up rack to convert sink airspace into work surface. Use a wall-mounted paper towel holder and magnetic spice storage to move items off the counter entirely. A foldable prep board that hangs on a hook when not in use is also one of the best space-saving kitchen ideas for tight spots.
What’s the best layout for a galley kitchen?
In a galley kitchen, keep the work triangle tight: fridge at one end, prep surface in the middle, stove at the other. Use one wall for cooking-related storage (pots, utensils, oils) and the opposite wall for pantry items and dishes. Avoid placing anything on the floor — rolling carts that tuck under the counter are the only exception. Vertical storage on both walls is non-negotiable in galley layouts.
Can tension rods be used in kitchen cabinets?
Absolutely. Tension rods are one of the best no-drill kitchen storage tools available. Install them horizontally inside cabinet doors to hold spray bottles upright. Install them vertically to create dividers for baking sheets and cutting boards. Use two parallel rods to create a hanging basket shelf inside a deep cabinet. They require zero tools, cost under $5 each, and leave no marks when removed.
How do I organize a pantry-free apartment kitchen?
Treat every available surface as potential pantry space. A rolling slim cart becomes your pantry. Inside-cabinet-door organizers hold spice backups and small packets. The space above upper cabinets can hold rarely used bulk items in labeled boxes. A freestanding shelving unit in a nearby closet or hallway can serve as overflow pantry. The key is treating the problem as a small kitchen organization challenge rather than a storage problem — it’s about smart placement, not more space.
What’s the fastest tiny kitchen hack with the biggest impact?
Clear your countertops completely. It takes five minutes, costs nothing, and immediately makes your kitchen feel larger, cleaner, and more functional. Every other tiny kitchen hack builds on this foundation. No organizer, shelf, or cart will work as well as it should if the countertops are still covered.
Final Thoughts: Tiny Kitchens Don’t Need More Space — Just Smarter Strategy
A tiny kitchen isn’t a design flaw. It’s a layout puzzle.
And once you understand that most small kitchens feel cramped because of horizontal clutter and wasted vertical space, everything changes.
You don’t need to knock down walls.
You don’t need custom cabinetry.
You definitely don’t need your landlord’s permission.
You need:
- Clear countertops
- Smarter cabinet layering
- Vertical storage that works for renters
- A layout that supports how you actually cook
The biggest shift happens when you stop trying to add more storage and start trying to use space differently.
Even one change — like installing shelf risers or clearing your counters — can make your kitchen feel noticeably larger within minutes. Stack a few of these tiny kitchen hacks together, and suddenly a cramped 70-square-foot space feels organized, functional, and calm.
And that’s the real goal.
Not Pinterest perfection.
Not aesthetic minimalism for show.
But a kitchen that works with you — not against you.
Start small. Pick one high-impact hack. Measure before you buy. Stay renter-safe. And remember: smart placement beats square footage every time.
Your kitchen may be tiny.
But it doesn’t have to feel that way.