How Long Do Command Strips Last on a Wall?
What actually determines long-term hold — and why there is no single manufacturer-published number of months or years that applies to every Command product and wall.
Command’s current instructions do not give one universal installed lifespan for all strips. A correctly installed product can remain in place long term, but the safe answer is to follow the exact product’s surface, weight, temperature, application, and removal instructions rather than assuming a fixed multi-year life. Standard Picture Hanging Strips are intended for compatible smooth surfaces, should be applied only after waiting at least 7 days after painting, and require the specified installation sequence. Replace the installation if the item shifts, the strip begins lifting, or the attachment no longer looks secure.
At a Glance
Fixed Lifespan?
No universal number of months or years is published for every installed Command product.
Best Surface
Compatible smooth, sound surfaces such as properly cured painted drywall.
Fresh Paint
Current Command guidance says to wait at least 7 days after painting before use.
Removal
Use the specified stretch-release method: slowly straight down against the wall, never outward.
How Long Do Command Strips Last? What the Manufacturer Actually Says
For renters, the tempting answer is a neat number such as “one year” or “three years.” Current Command instructions do not provide one universal installed lifespan that applies to every strip, hook, room, wall finish, and load.
That matters because Command sells different product families with different weight limits, surface rules, temperature guidance, and room-specific designs. A standard Picture Hanging Strip, a utility hook, and a bathroom-rated product should not be treated as though they have identical long-term performance.
What Actually Affects Long-Term Hold
How reliable an installation remains over time depends on whether the product is being used inside the conditions it was designed for. These factors matter more than an arbitrary calendar age.
Five Things to Check
1. Exact product and configuration. Hook products and Picture Hanging Strips use different rating systems. For picture hanging, follow the exact number of pairs, maximum item weight, and maximum frame dimensions listed for that product.
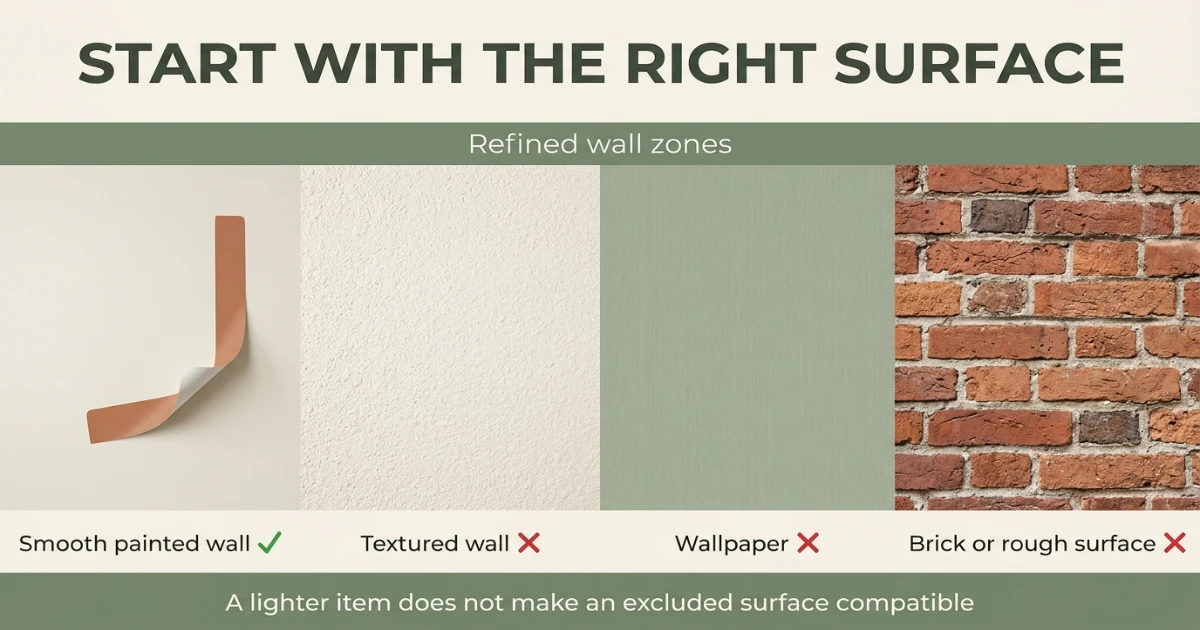
2. Surface compatibility. Current standard Command Picture Hanging Strip guidance excludes textured walls, wallpaper, brick, rough surfaces, and fabrics. Using a lighter item does not make an excluded surface suitable.
3. Paint condition. The wall finish must be sound. Peeling, chalky, poorly bonded, or recently applied paint can create a weak link even when the adhesive itself is working as designed.
4. Installation quality. Surface preparation, pressure, the specified wait time, and full engagement of paired strips all affect the installation.
5. Room/product match. Bathrooms and other moisture-prone areas have dedicated Command products. Use the exact product intended for the environment rather than assuming a standard strip has the same rules.
Surface Compatibility Comes Before Longevity
A long-lasting installation starts with a surface the exact product is designed to use. Current Command Picture Hanging Strip guidance lists painted drywall and other smooth surfaces among compatible options, while excluding wallpaper, textured walls, brick, rough surfaces, and fabrics.
| Surface | Current Standard Picture-Strip Guidance | Renter Note |
|---|---|---|
| Smooth, sound painted drywall | Compatible when the exact product instructions allow it | Wait at least 7 days after painting and prepare the surface correctly. |
| Finished wood, glass, tile, metal | Commonly listed among compatible smooth surfaces | Check the exact product page because finishes and product families differ. |
| Textured or rough wall | Do not use standard Picture Hanging Strips | Do not compensate with extra strips or a lighter item. |
| Wallpaper | Do not use | Do not perform a “test patch” that could tear the wall covering. |
| Brick / rough masonry | Do not use standard strips | Choose a mounting system specifically intended for masonry if your lease permits it. |
Installation Steps That Support Reliable Hold
For current Picture Hanging Strips, Command’s application sequence is specific. Following it is more useful than trying to predict a lifespan from the calendar.
Manufacturer-Aligned Installation Sequence
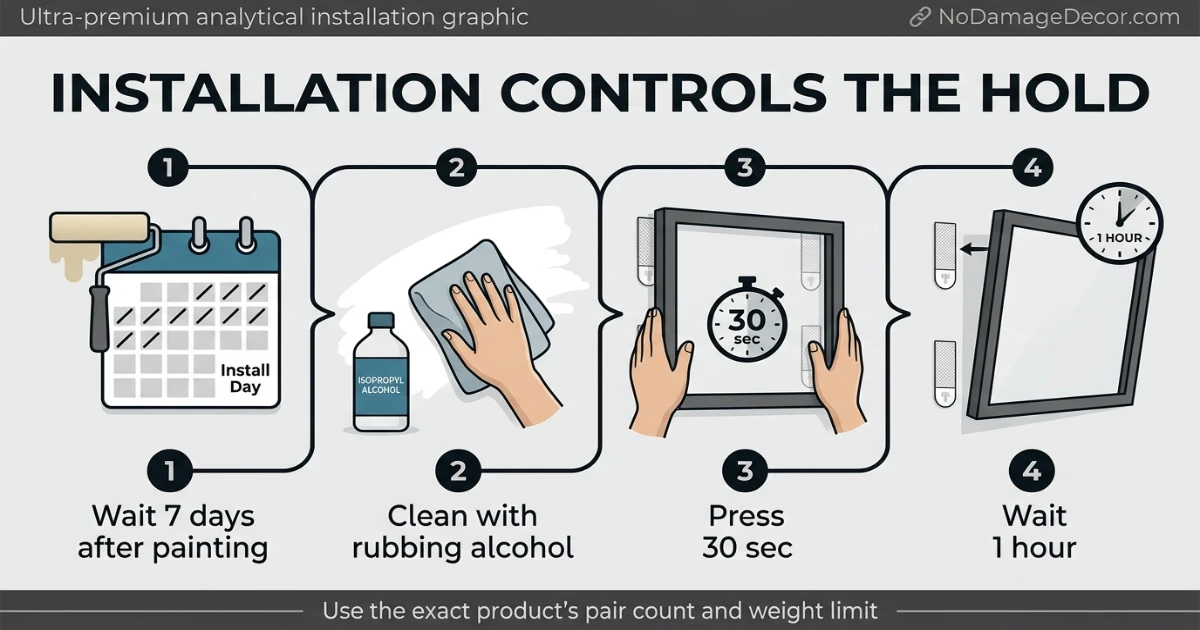
Step 1: Wait after painting. Command says to wait at least 7 days after painting before use.
Step 2: Clean with rubbing alcohol. Use rubbing alcohol for surface preparation rather than household cleaners or water, which may leave residue.
Step 3: Use the exact configuration. Follow the product’s specified number of strip pairs, weight limit, and maximum frame size. Do not invent a higher capacity by adding extra strips.
Step 4: Press firmly. Current Picture Hanging Strip directions include pressing the frame and then the wall-side strips firmly for 30 seconds.
Step 5: Wait before remounting. After the wall-side strips are reinforced, wait 1 hour for the adhesive to build before remounting the frame.
Step 6: Fully engage every pair. Align the paired strips and press until each pair clicks into place.
For current picture-strip limits, use our Command strips weight limit guide.
Room, Temperature, and Moisture Conditions
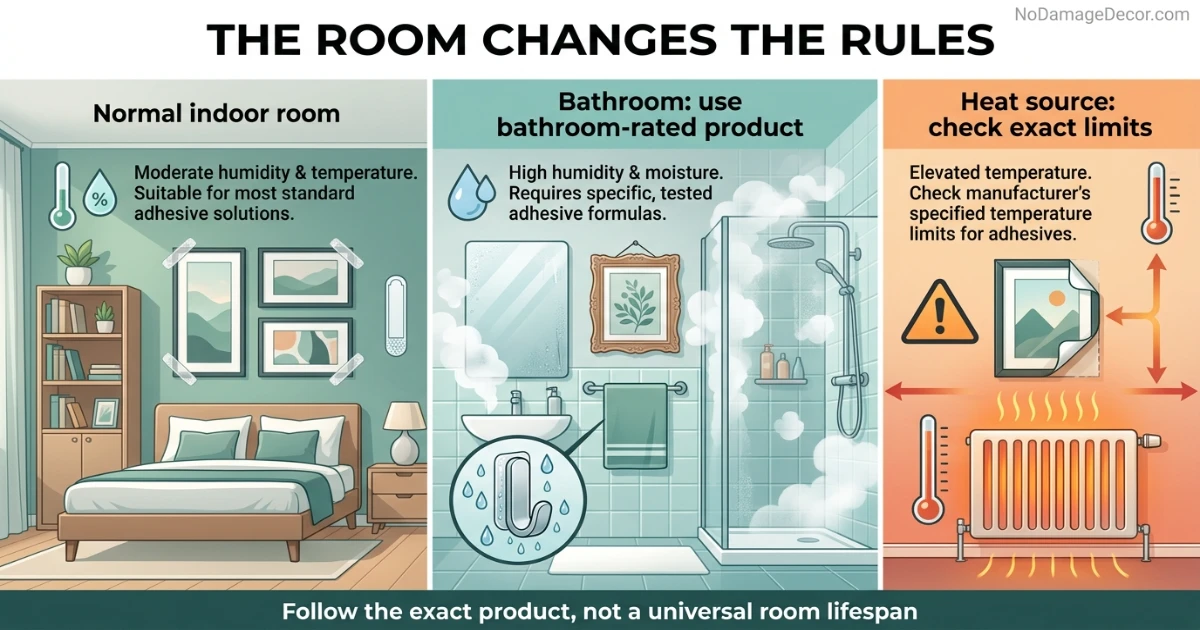
Do not apply one environmental rule to every Command product. Standard indoor products and bathroom-specific products are separate lines, and the exact package should control your decision.
Three Useful Checks
Normal indoor rooms: Use the product only inside its stated surface, weight, and temperature conditions.
Bathrooms or moisture-prone rooms: Choose a Command product specifically marketed for bathroom or wet-area use rather than assuming a standard strip has the same moisture tolerance.
Heat-exposed locations: Some current indoor Command product instructions list a range around 50°F to 105°F (10°C to about 40°C). Because limits vary by product, check the exact package before using strips beside heaters, hot appliances, or other high-temperature locations.
Signs the Installation Needs Attention
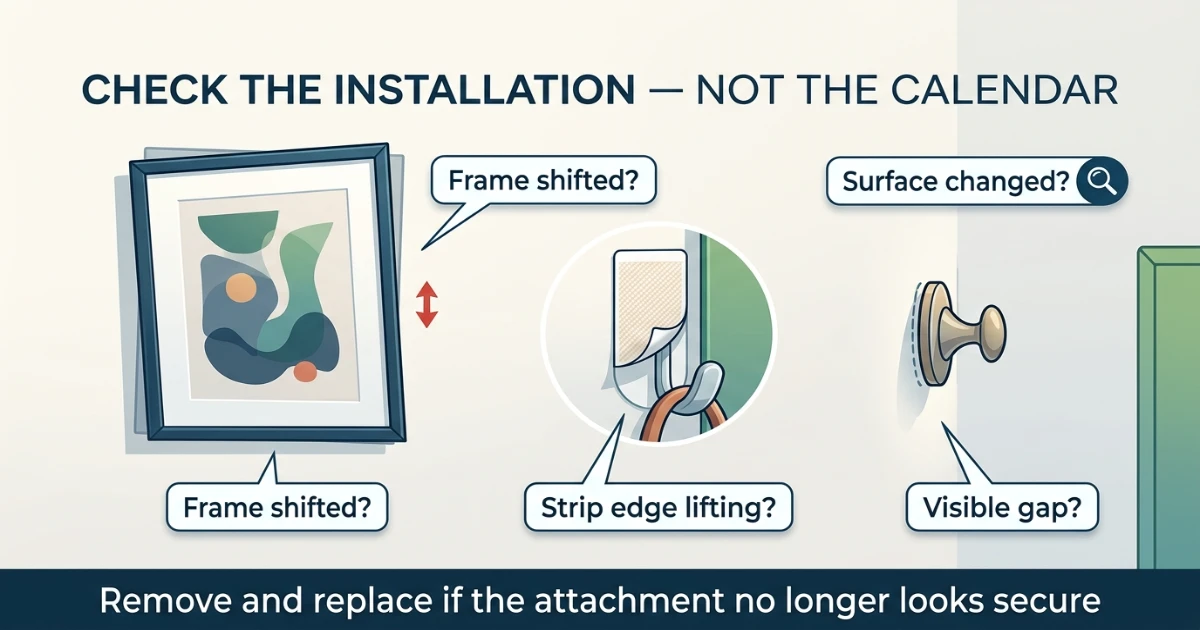
Command does not publish a universal “replace every X months” schedule for all strips. For renters, a practical approach is to look at the installation itself rather than assuming a fixed service interval.
Reassess the Installation If You Notice:
A visible gap: The attachment is no longer sitting flush against the wall.
A lifting edge: Part of the adhesive or mounting base is separating from the surface.
A shifted frame: A picture that was level has moved, tilted, or no longer feels fully engaged.
Wall-finish changes: Paint near the mounting point is cracking, peeling, softening, or otherwise changing.
If the installation no longer looks secure, remove the item and reassess the surface and product rather than pressing a failing strip back into service. For troubleshooting, see why Command strips fall off and how to fix the problem.
Removing Command Strips After Long-Term Use
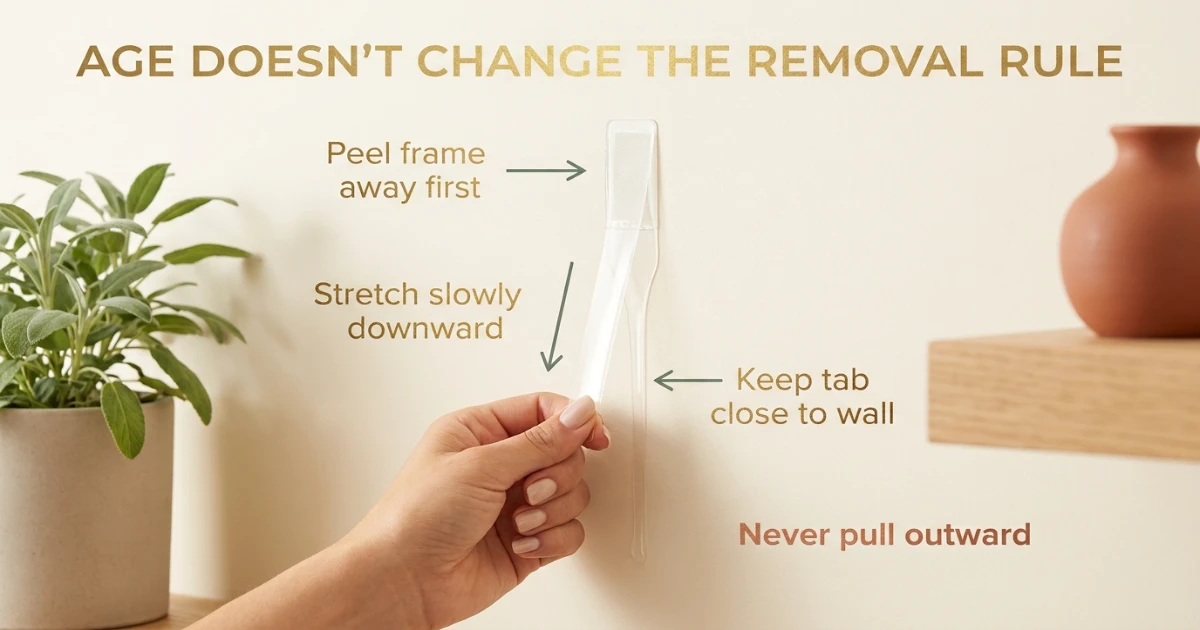
The normal removal rule does not change just because a strip has been on the wall for a long time. For Picture Hanging Strips, peel the frame away first, then stretch each exposed removal tab slowly straight down against the wall. Do not pull the strip outward toward you.
If residue remains afterward, use our Command strip residue removal guide. If the pull tab itself breaks, follow the broken Command strip tab removal guide.
What to Check Before Buying
Renter Buying Checklist
Exact product category: Picture Hanging Strips, utility hooks, and bathroom products do not share one universal rating.
Published total load: Use the exact current weight limit and required strip-pair configuration.
Maximum frame dimensions: For picture hanging, size limits can matter as well as weight.
Surface compatibility: Make sure your wall is actually included in the current product instructions.
Room compatibility: Use a bathroom-specific product where the manufacturer calls for one.
Removal instructions: Read them before installation so you know how the product is supposed to come off later.
For alternatives that avoid adhesive mounting entirely, see our hang art without nails guide and no-damage wall decor ideas.
Renter-Safety Verdict
Do not manage Command strips by an invented expiration date. Current manufacturer guidance does not give one universal installed lifespan for every product. A more defensible renter strategy is to use the exact product on a compatible smooth surface, follow the full installation sequence, stay within the published configuration and load, use room-appropriate products, and remove the item if the attachment begins to shift or lift.
That approach protects your wall better than assuming every strip is “good for three years” or replacing a sound installation on an arbitrary calendar schedule.
Sources & Renter-Safety Note
This guide distinguishes manufacturer instructions from NoDamageDecor editorial advice. Product rules can change, so verify the exact package or current official product page before installation.
Check the Weight Limit Before You Hang
Long-term reliability starts with the correct product and configuration. Compare the current picture-hanging limits before mounting your frame.
Command Strips Weight Limit GuideFrequently Asked Questions
How long do Command strips last on a wall?
Command does not publish one universal installed lifespan for every strip and situation. Long-term reliability depends on using the exact product within its published surface, weight, temperature, application, and room-use instructions.
Can Command strips stay up for years?
They are used as long-term hanging products, but there is no single manufacturer-published number of years that applies to every installation. Do not use a fixed calendar age as a substitute for the exact product instructions and the condition of the installation.
Do I need to replace Command strips every year?
Command does not publish a universal annual replacement schedule for all products. Reassess the installation if the frame shifts, a strip edge lifts, a gap appears, or the wall finish changes.
Can I reuse Command strips after removing them?
The adhesive strips are intended for one installation. Use new replacement strips that are specifically compatible with the hook or hanging system you are reusing, and follow the new strip’s current instructions.
Will Command strips work on textured walls?
Current standard Command Picture Hanging Strip guidance says not to use the products on textured walls or surfaces. Do not compensate by using extra strips or a lighter item.
Can I use Command strips in a bathroom?
Use a product specifically designed and labeled for bathroom or moisture-prone use. Standard and bathroom-specific Command products should not be treated as interchangeable.
What temperature is too hot for Command strips?
Temperature limits vary by product. Some current indoor Command products list a range around 50°F to 105°F (10°C to about 40°C). Check the exact current product page or package rather than applying one temperature range to every Command product.
Will older Command strips still remove cleanly?
Use the same manufacturer removal method: peel the mounted item away as directed, then stretch the exposed tab slowly straight down against the wall rather than pulling outward. If the tab breaks, use the broken-tab recovery method instead of prying.