Best Cleaning & Maintaining Peel-and-Stick Products (2026 Renter Guide)
The safest renter-friendly way to clean peel-and-stick wallpaper, tiles, hooks, and removable decor without ruining adhesion, lifting seams, or damaging your walls.
Peel-and-stick decor makes it easy for renters to transform a space without drilling, but the wrong cleaning routine can shorten its lifespan fast.
From removable wallpaper and backsplash tiles to floor tiles, adhesive wall hooks, shelf liners, and other rental-friendly decor, these products all rely on one thing: a strong adhesive bond. Too much moisture, harsh chemicals, grease buildup, or ignored lifting edges can turn a beautiful upgrade into a frustrating replacement job.
This guide explains how to clean and maintain peel-and-stick wallpaper, backsplash tiles, floor tiles, hooks, and liners the right way so they stay smooth, secure, and damage-free in real apartment living.
This renter-friendly guide covers peel-and-stick wallpaper, removable wallpaper, adhesive backsplash tiles, peel-and-stick floor tiles, adhesive wall hooks, drawer liners, shelf liners, and other removable decor commonly used in apartments, kitchens, bathrooms, bedrooms, entryways, and home offices.
Key Takeaways
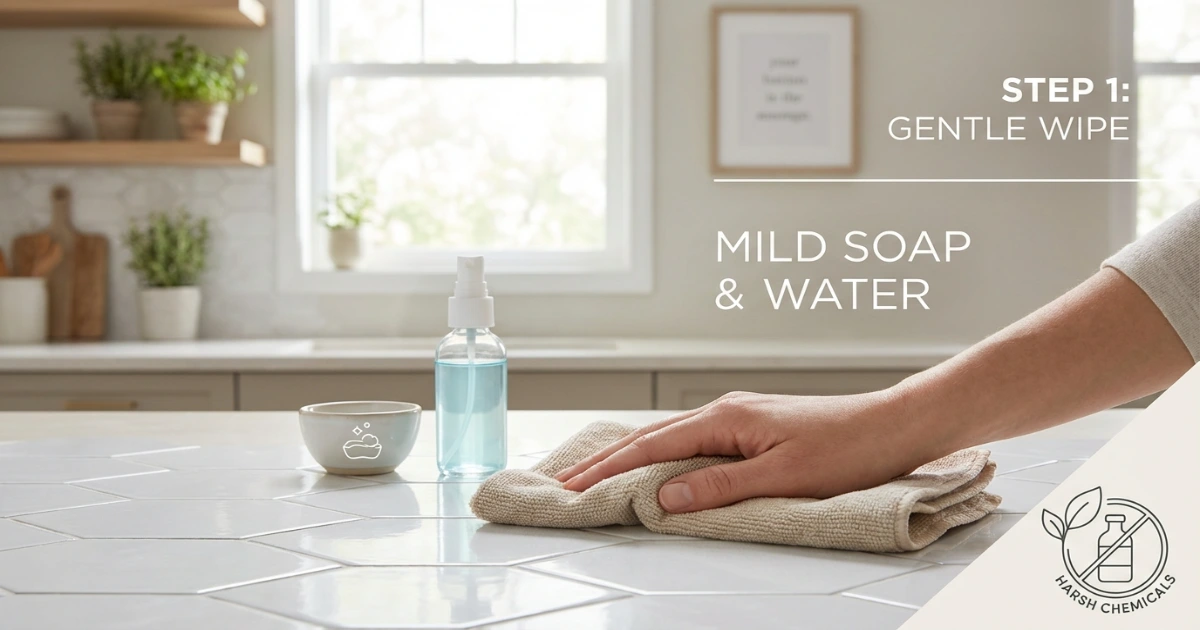
- Use a barely damp microfiber cloth, not a wet sponge or soaking cloth.
- Apply cleaner to the cloth, never directly to the peel-and-stick surface.
- Dry seams, corners, and edges immediately after cleaning.
- Avoid bleach, ammonia, citrus solvents, steam, and abrasive pads.
- Inspect peeling edges early before moisture gets underneath.
- Kitchen and bathroom products need more frequent maintenance than bedroom or office wall decor.
Why Peel-and-Stick Products Need Special Care
Peel-and-stick decor is not the same as a painted wall, ceramic tile, or standard built-in finish. Most products are made from layered materials: a decorative face, a printed or coated finish, and an adhesive backing. Each layer reacts differently to water, chemicals, scrubbing pressure, heat, and humidity.
That is why the wrong cleaning method causes so many avoidable problems. Oversaturating a peel-and-stick wallpaper panel can weaken the adhesive at the seams. Using harsh degreasers on backsplash tiles can dull the surface finish. Scrubbing floor tiles too aggressively can create tiny scratches that trap more grime over time.
Apartment renters often install these products in high-risk areas too: around stoves, near sinks, in humid bathrooms, on sunny walls, or in tight entryways with heavy daily use. Without the right maintenance habits, their lifespan drops fast. With the right routine, quality peel-and-stick products can stay attractive and functional for years.
Safe Cleaning Supplies and What to Avoid
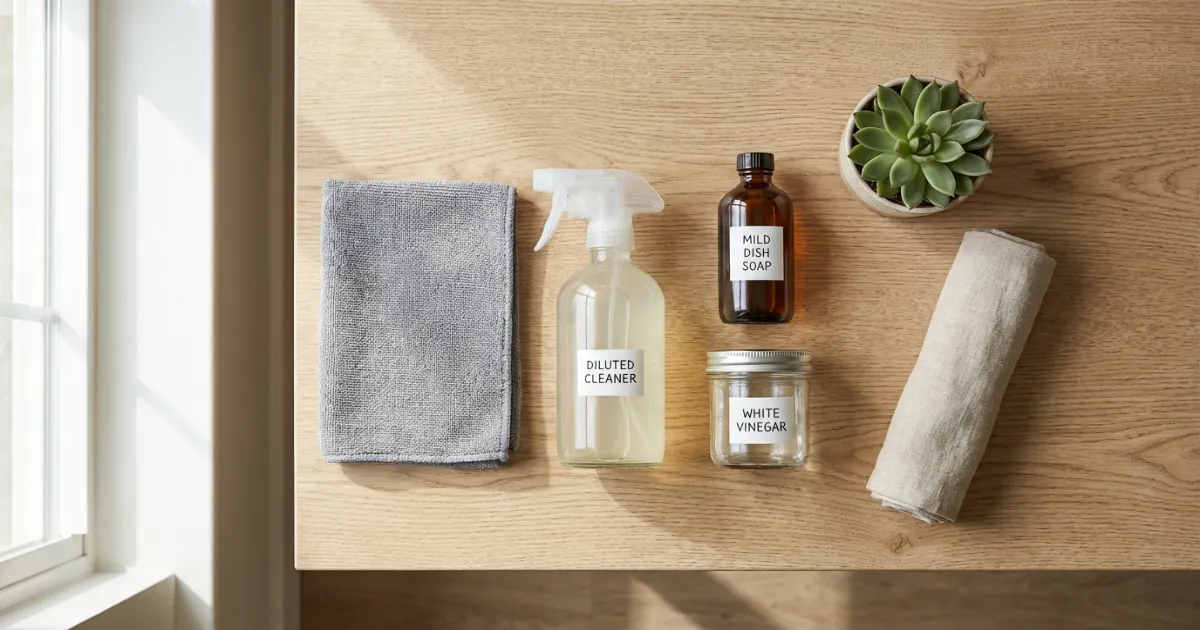
The safest cleaning supplies for peel-and-stick products are mild, low-moisture, and non-abrasive. For most renters, that means a microfiber cloth, a small amount of diluted dish soap, diluted white vinegar, warm water, and a second dry cloth for immediate drying.
| Supply | Use Case | Status |
|---|---|---|
| Microfiber cloth | Safe for wallpaper, tiles, hooks, and liners | Safe |
| Diluted mild dish soap | Fingerprints, light grease, general wipe-downs | Safe |
| Diluted white vinegar | Mineral spots, light grime, backsplash touch-ups | Safe |
| Warm water | Light dust and surface refreshes | Safe |
| Soft toothbrush | Grout lines and detailed edges | Safe (gentle use) |
| Bleach cleaners | Too harsh for most finishes and adhesives | Avoid |
| Ammonia glass sprays | Can dull surfaces and stress adhesives | Avoid |
| Citrus solvents | Can break down coatings and adhesive chemistry | Avoid |
| Steam cleaners or steam mops | Heat + moisture is one of the fastest failure causes | Avoid |
| Abrasive pads | Scratch coatings and damage finishes | Avoid |
Keep one microfiber cloth and one small labeled spray bottle just for removable decor maintenance. That makes it much less likely you will accidentally use the wrong product on wallpaper or adhesive tiles.
How Often to Clean Peel-and-Stick Products
The right cleaning frequency depends on the room, the product type, and how much grease, dust, humidity, or friction that area sees. Light, consistent maintenance is always safer than occasional deep scrubbing.
Kitchen backsplash tiles near the stove, entryway adhesive hooks, and other high-touch surfaces.
Bathroom tiles, shelf liners, drawer liners, and peel-and-stick floor tiles in active areas.
Accent wall wallpaper, low-traffic decals, and decorative panels in bedrooms or home offices.
How to Spot-Test Before Cleaning
Before you clean any peel-and-stick surface fully, test your cleaning method on a hidden edge or corner. This matters because different wallpaper brands, tile finishes, and coatings can react differently even when they look similar.
- Choose a hidden corner or seam.
- Apply a tiny amount of cleaner to the cloth, not the wall.
- Lightly blot the test area.
- Wait about 60 seconds.
- Check for color change, cloudiness, softening, edge lift, or residue.
- If everything looks normal, clean the rest of the surface the same way.
Directly spraying cleaner onto peel-and-stick wallpaper or tile is one of the most common causes of edge lifting. Always spray the cloth first, then wipe gently.
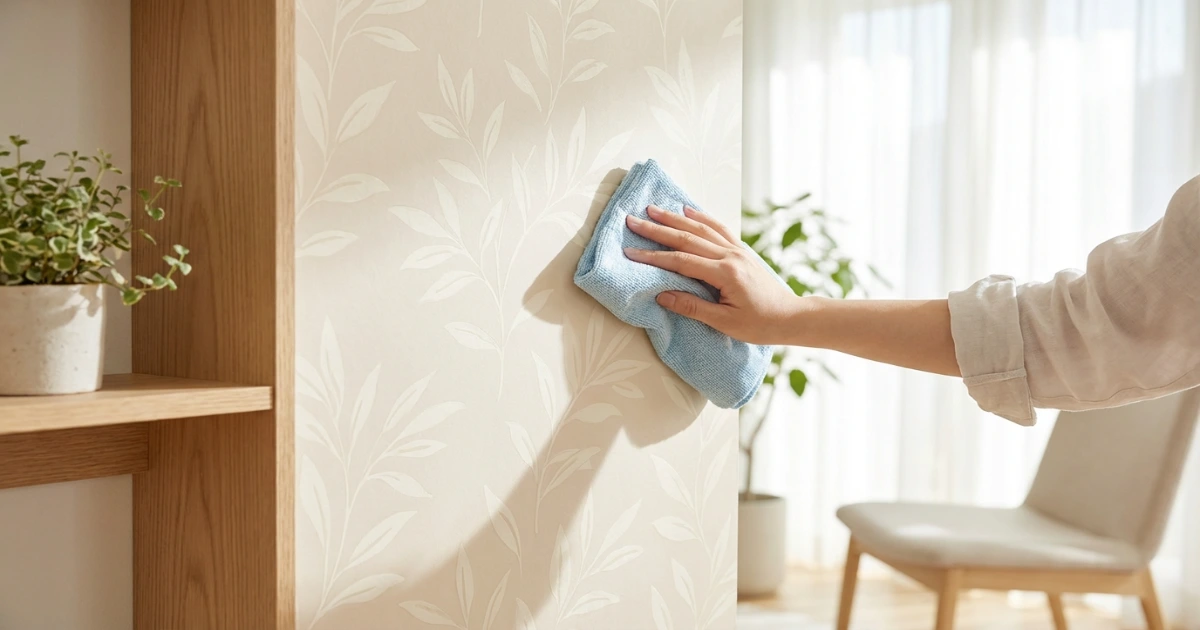
A barely damp microfiber cloth is the safest tool for routine wallpaper maintenance.
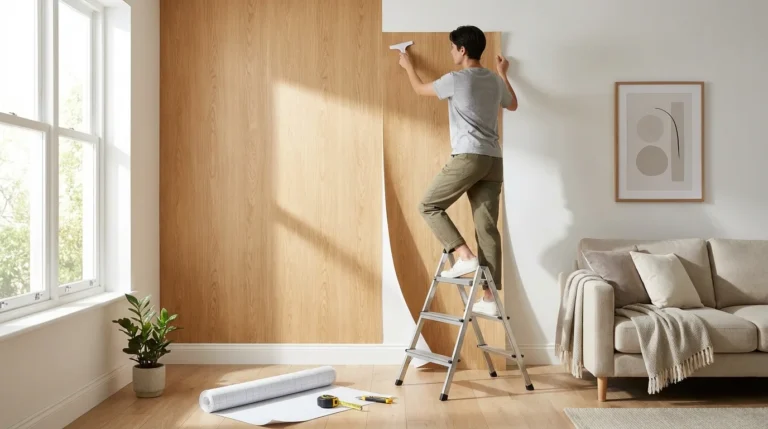
How to Clean Peel-and-Stick Wallpaper
Peel-and-stick wallpaper is one of the most effective renter upgrades because it changes the look of a room quickly without nails or paint. It is also one of the most sensitive products to bad cleaning habits because its seams and edges are vulnerable to moisture.
- Dust first with a dry microfiber cloth, lint roller, or soft brush.
- For fingerprints or minor marks, use a barely damp cloth with diluted dish soap.
- Wipe gently in controlled strokes instead of scrubbing.
- Keep extra moisture away from seams and corners.
- Dry the area immediately with a second cloth.
Fabric-textured removable wallpaper needs even more care than smooth vinyl wallpaper. It can trap dust more easily and may not tolerate moisture as well. If you are comparing options for better durability, browse these peel-and-stick wallpaper brands for finishes better suited to real rental wear.
How to Clean Peel-and-Stick Backsplash Tiles
Backsplash tiles live in one of the toughest environments in any rental: grease, steam, cooking residue, sink splashes, and frequent wipe-downs. The goal is to remove grime without letting cleaner seep into tile edges or faux grout lines.
- Remove loose residue first Wipe away crumbs or fresh splatter before it dries into the surface.
- Use a gentle diluted cleaner A few drops of mild dish soap in warm water is enough for most backsplash maintenance.
- Apply cleaner to the cloth Never spray directly onto seams, edges, or grout lines.
- Wipe lightly and evenly Focus on grease-prone areas without scrubbing hard.
- Dry immediately Use a dry towel or microfiber cloth so moisture does not sit near the adhesive.
If you are upgrading your kitchen beyond backsplash care, this spring kitchen decor guide has more renter-friendly ideas that pair beautifully with peel-and-stick updates.
Weekly light wipe-downs are far safer than letting grease build up and scrubbing later.
How to Clean Peel-and-Stick Floor Tiles
Peel-and-stick floor tiles face constant friction from shoes, dirt, pet hair, and dragged objects. That makes grit control especially important. Dry cleaning always comes first.
Start With Dry Cleaning
Sweep or vacuum without a beater bar before any damp cleaning. This prevents grit from being rubbed into the tile surface.
Use a Damp Mop, Not a Wet Mop
Floor tiles can handle light damp cleaning, but they should never be flooded. A mop that feels only slightly damp is ideal. Too much water seeps into edges and weakens the bond to the subfloor.
Avoid These Common Floor Tile Mistakes
- Steam mops
- Wax-based floor polishes
- Harsh alkaline cleaners
- Scrubbing pads or stiff brushes
Cleaning Adhesive Wall Hooks and Removable Accessories
Adhesive wall hooks, cable clips, mounting strips, and removable accessories are often the most used peel-and-stick items in an apartment. They collect oils from hands, hallway dust, and residue from whatever hangs on them.
Clean the visible surface with a barely damp cloth and a small amount of diluted soap. Be especially careful not to let moisture reach the adhesive pad behind the hook. If the hook holds heavier items, inspect it regularly rather than waiting for failure.
For art strips and removable hanging systems, this guide on how to hang art without nails pairs well with safe maintenance habits.

A gentle wipe around hook edges helps prevent residue buildup without stressing the adhesive strip.
Maintaining Shelf and Drawer Liners
Shelf liners and drawer liners often get ignored until they are stained, curled, or collecting crumbs. In kitchens and bathrooms especially, regular check-ins matter because trapped moisture and residue can shorten their usable life.
- Remove items seasonally and wipe liners with a barely damp cloth.
- Allow shelves and liners to dry fully before replacing items.
- Pay extra attention near sink areas, humid bathrooms, and under cleaning supplies.
- Replace badly curled, moldy, or permanently stained liners instead of trying to save them.
How Heat, Steam, Grease, and Sunlight Affect Adhesive Decor
Sometimes the biggest threat to peel-and-stick products is not cleaning at all. It is the room environment. Heat, humidity, grease, and UV exposure all weaken adhesives over time.
Heat
Direct exposure near stoves, ovens, heaters, or radiators can soften adhesive and distort the product.
Steam
Bathrooms and kitchens with poor ventilation can cause edges to lift and trap moisture behind the product.
Grease
Airborne kitchen grease builds up quickly and makes cleaning more aggressive if you wait too long.
Sunlight
Long-term direct sun can fade colors and gradually degrade adhesive performance on exposed walls.
If you are styling a renter-friendly room beyond adhesive decor, explore more no-damage wall decor ideas for alternatives that reduce stress on one single product type.
How to Deal With Peeling Edges
Lifting edges are the earliest visible sign that a peel-and-stick product is under stress. Catching them early is the best way to prevent a bigger failure.
- Do not press the edge back down over dirt or grease. Clean and dry the area first.
- Use a hair dryer on low heat to gently warm the lifted section.
- Press the edge down firmly with a clean cloth or soft tool.
- For stubborn seams, use a wallpaper seam adhesive designed for removable products.
- Do not use random household tape over peeling corners.
Common Cleaning Mistakes to Avoid
- Spraying cleaner directly onto wallpaper, tiles, or hooks
- Using a soaking-wet cloth or sponge
- Scrubbing with abrasive pads
- Using bleach, ammonia, or citrus degreasers
- Steam cleaning or steam mopping adhesive surfaces
- Ignoring seams and lifted corners during routine cleaning
- Cleaning newly installed products before they have cured
Maintenance Schedule and Checklist
A little routine care makes a huge difference. This checklist is a simple system renters can actually stick to.
- Dust removable wallpaper monthly with a dry microfiber cloth or lint roller.
- Wipe backsplash tiles weekly if they are exposed to grease or regular cooking.
- Inspect all seams and corners every few months for early lifting.
- Check bathroom products monthly for humidity issues or mildew risk.
- Sweep floor tiles before every damp cleaning session.
- Dry all cleaned surfaces right away, especially around edges.
- Replace failing adhesive strips before they drop heavier items.
- Ventilate kitchens and bathrooms to reduce steam exposure.
A simple renter-safe cleaning kit is enough for most peel-and-stick maintenance jobs.
Expert Renter Tips
Smart habits that make peel-and-stick decor last longer
- Start with wall prep: Clean, dry, smooth surfaces always perform better than dusty or greasy ones.
- Let products cure: Wait 48 to 72 hours after installation before any damp cleaning.
- Match product to room: Use kitchen- or bathroom-rated products in humid areas.
- Control humidity: Run exhaust fans and keep steam levels lower in bathrooms and kitchens.
- Protect sun-heavy walls: Consider UV film or curtains in very bright rooms.
- Think beyond walls: Cabinet fronts, furniture sides, and glass can sometimes be better adhesive surfaces than rental-painted drywall.
- Document your walls: Before-and-after photos help protect your deposit and make removal disputes easier to handle.
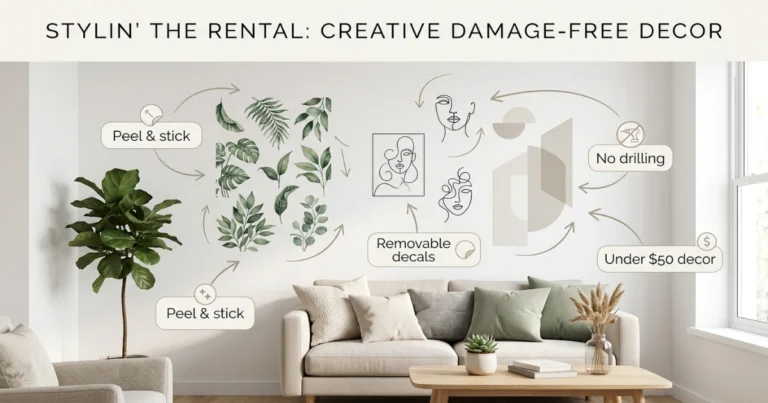
If you want to expand the look of your space without drilling, browse more adhesive wall art ideas and renter-safe styling inspiration across NoDamageDecor.
When to Replace Instead of Clean
Even the best-maintained peel-and-stick product has a limit. Replacement makes more sense than continued cleaning when the material is failing in multiple places or has become permanently damaged.
- Edges are lifting repeatedly in multiple areas
- Stains no longer respond to gentle cleaning
- The surface looks cracked, faded, or warped
- There is mildew or mold behind the product
- The adhesive is breaking down and leaving residue
When you are ready for a fresh renter-friendly update, the NoDamageDecor homepage is a strong place to start for new room-by-room ideas.
Frequently Asked Questions
Can you wash peel-and-stick wallpaper?
Yes, most vinyl-based peel-and-stick wallpaper can be wiped clean, but it should not be soaked. Use a barely damp microfiber cloth with diluted dish soap and dry the surface immediately.
What cleaners are safe for peel-and-stick products?
The safest choices are diluted mild dish soap, diluted white vinegar, and plain water on a well-wrung cloth. Avoid bleach, ammonia, citrus solvents, steam, and abrasive cleaners.
How do you keep peel-and-stick wallpaper from peeling?
Start with a clean, dry, smooth wall, allow the product to cure fully after installation, avoid excess humidity and heat, and keep seams dry during all cleaning.
Is vinegar safe to use on peel-and-stick products?
Diluted white vinegar is generally safe for many vinyl-based peel-and-stick surfaces, but it should always be spot-tested first and never used undiluted.
Can humidity ruin peel-and-stick decor?
Yes. High humidity and repeated steam exposure are major causes of edge lifting and adhesive failure, especially in bathrooms and kitchens.
How often should peel-and-stick backsplash tiles be cleaned?
Tiles near the stove should usually be wiped weekly. Lower-splatter kitchen zones can often be cleaned every two to four weeks.
Can you repair damaged or curling peel-and-stick edges?
Yes, many small lifts can be repaired by cleaning and drying the area, warming the edge gently with a hair dryer on low, and pressing it back into place.
How long do peel-and-stick products typically last in apartments?
Quality products can often last two to five years in standard living areas, though humidity, sun, and poor maintenance can shorten that range.
Will cleaning peel-and-stick products damage my rental walls?
Not when done correctly. The main risk is too much moisture reaching the wall behind the product. A barely damp cloth and immediate drying help prevent that.
Your Peel-and-Stick Decor Can Last Much Longer Than Most Renters Think
Peel-and-stick products are one of the smartest renter upgrades because they offer style, flexibility, and deposit-friendly decorating. The secret is not complicated: keep moisture controlled, clean lightly and consistently, fix lifting edges early, and match each product to the right room.
That small amount of care protects removable wallpaper, adhesive tiles, floor tiles, hooks, and liners from the exact problems that make renters think these products “do not last.” In reality, most failures come from avoidable cleaning mistakes or environmental stress.
For more renter-safe upgrades, explore our guides on peel-and-stick decor ideas, small apartment lighting, and no-damage wall decor.