How to Patch Nail Holes Before Moving Out
A careful renter-focused process for assessing, patching, finishing, and documenting small wall holes before move-out.

Quick Answer
You can often patch a clean, small nail hole with a compatible spackling compound, a flexible putty knife, fine-grit sanding material, and correctly matched touch-up paint—but check your lease first. Follow the exact product instructions, keep the repair area small, and preserve original before-and-after photos. If the wall has an anchor hole, torn drywall paper, cracking, crumbling material, an unfamiliar finish, or paint you cannot match, ask your landlord or property manager in writing before repairing it.
At a Glance
Small pin holes and standard nail holes filled with lightweight spackle, sanded flush, and touched up with matching paint.
Matching the existing wall paint color and finish closely enough that the repair disappears under normal lighting.
Overfilling the hole or sanding too aggressively, which creates a visible bump or a dull patch on the wall.
Original move-in and move-out photos, written landlord communication, and a careful repair create a clearer record of the wall condition.
Why Nail Holes Matter for Your Deposit
Nail holes are a common move-out question because the line between ordinary wear and tenant-caused wall damage varies by lease and jurisdiction. A few small picture-hanging holes may be treated differently from anchor holes, torn drywall, extensive hole patterns, or a visibly mismatched repair.
Do not rely on a nationwide rule. Review your lease, compare the wall with your move-in documentation, and check the current state or local rules that apply where the rental is located.
Check Your Lease and Local Rules First
Before you pick up a putty knife, review your lease for language about wall repairs, nail holes, painting, or alterations. Some leases require tenants to fill all holes before move-out. Others prohibit tenants from doing their own repairs. If your lease is unclear, ask your property manager in writing and save the response. For a deeper look at whether a landlord can charge for nail holes, see our apartment decor mistakes that cost your deposit.
Before You Start
Patching nail holes is a manageable DIY project, but it is worth taking a few minutes to prepare. The goal is not just to fill the holes—it is to make the repair invisible enough that no one notices it during a move-out walkthrough.
Pre-Patching Checklist
- Review your lease for any repair or alteration restrictions
- Check your state or city tenant rights resources for rules about nail holes and normal wear
- Photograph every wall with holes before you begin and keep the original, unedited files
- Identify the wall surface type—drywall, plaster, or another material
- Determine the paint finish—flat, eggshell, satin, or semi-gloss
- Gather all tools and materials before you start so you do not have to stop mid-repair
- Protect the floor below each repair area with a drop cloth or old towel
If you took move-in photos, pull them up before you patch. Compare the current wall condition to the original photos. If the holes you are patching were already present when you moved in, you have documentation that they were pre-existing.
Tools and Materials You Will Need
Most nail hole repairs require only a few inexpensive supplies. You do not need professional equipment, but using the right tools makes the difference between a visible patch and a repair that disappears.
| Item | Purpose | What to Look For |
|---|---|---|
| Lightweight spackling compound | Fills small holes and dries hard enough to sand | Choose a product whose current instructions cover your wall material and repair depth; a dry-time indicator can make timing easier |
| Putty knife | Applies and smooths spackle | A flexible 1 to 3-inch blade works well for most nail holes; avoid stiff blades that are hard to control |
| Fine-grit sandpaper or sanding block | Smooths dried spackle flush with the wall | 220-grit or finer is appropriate for finish sanding; avoid coarse grits that can scratch surrounding paint |
| Clean cloth or sponge | Wipes away dust after sanding | Use a lightly dampened cloth; do not soak the wall |
| Touch-up paint | Blends the repair into the surrounding wall | Must match both color and finish; if you do not have leftover paint, see the paint matching section below |
| Small paint brush or foam applicator | Applies touch-up paint precisely | A small brush with soft bristles works better than a roller for tiny nail holes |
Assess the Damage: What Kind of Holes Do You Have?
Not all wall holes are the same. A tiny picture-hanging hole, a screw hole, and a removed wall anchor can require different repair methods even when they look similar from a distance. Look at the surrounding drywall or plaster as well as the opening itself: torn paper, cracking, crumbling material, or a loose anchor are signs that a simple nail-hole patch may not be the right repair.
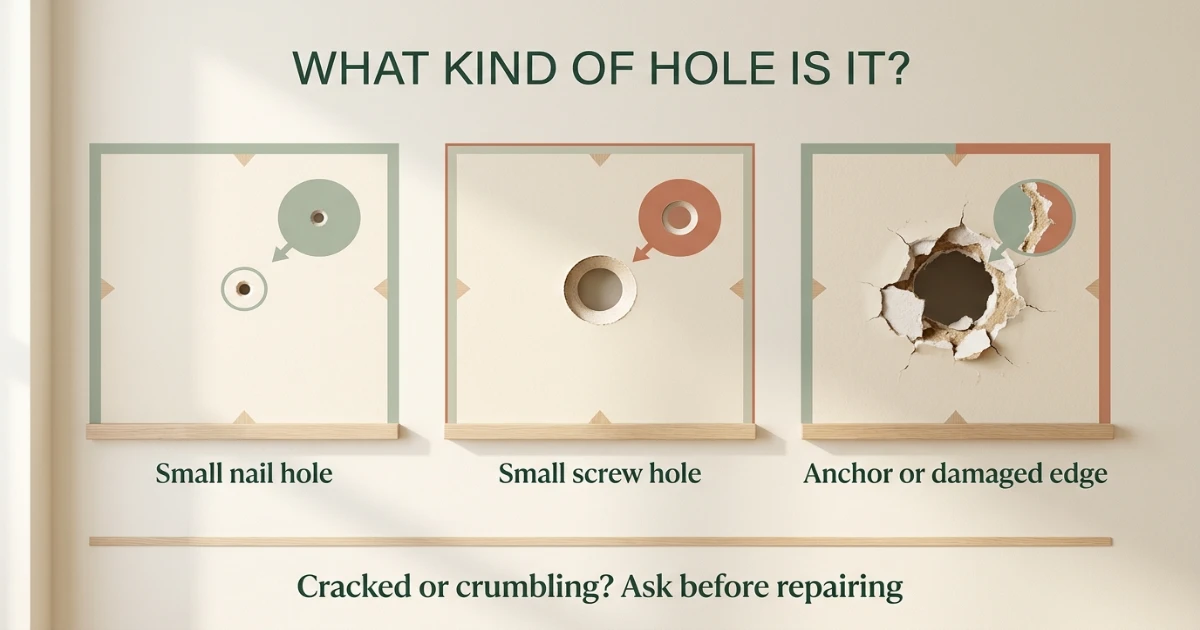
| Hole Type | Typical Size | Best Repair Approach | When to Get Help |
|---|---|---|---|
| Pin holes from small nails or tacks | Less than 1/16 inch | Lightweight spackle, one thin application, sand, touch up | Rarely needs professional help |
| Standard picture-hanging nails | Approximately 1/16 to 1/8 inch | Lightweight spackle, one to two thin applications, sand, touch up | DIY-appropriate for most renters |
| Larger nails or small screw holes | Approximately 1/8 to 1/4 inch | Spackle in two thin layers, allowing drying time between layers | DIY-appropriate if you are comfortable with the process |
| Wall anchor or molly bolt holes | 1/4 inch or larger | May require a patching compound or drywall repair kit; spackle alone may not be sufficient | Consider contacting your landlord or a professional if you are unsure |
| Cracked or crumbling drywall around the hole | Varies | Do not attempt a simple spackle repair; the area may need drywall tape or professional attention | Contact your landlord in writing |
When in Doubt, Ask First
If a hole is larger than a standard nail hole, has visible cracking around it, or you are unsure whether the wall is drywall or plaster, do not guess. Contact your landlord or property manager in writing, describe what you see, and ask how they would like it handled. In many cases, the landlord would rather handle larger repairs themselves than risk a tenant making the problem worse.
Step-by-Step: How to Patch Nail Holes
Follow these steps in order. Rushing the drying or sanding stages is the most common reason repairs end up looking worse than the original hole.
Clean the Area Around Each Hole
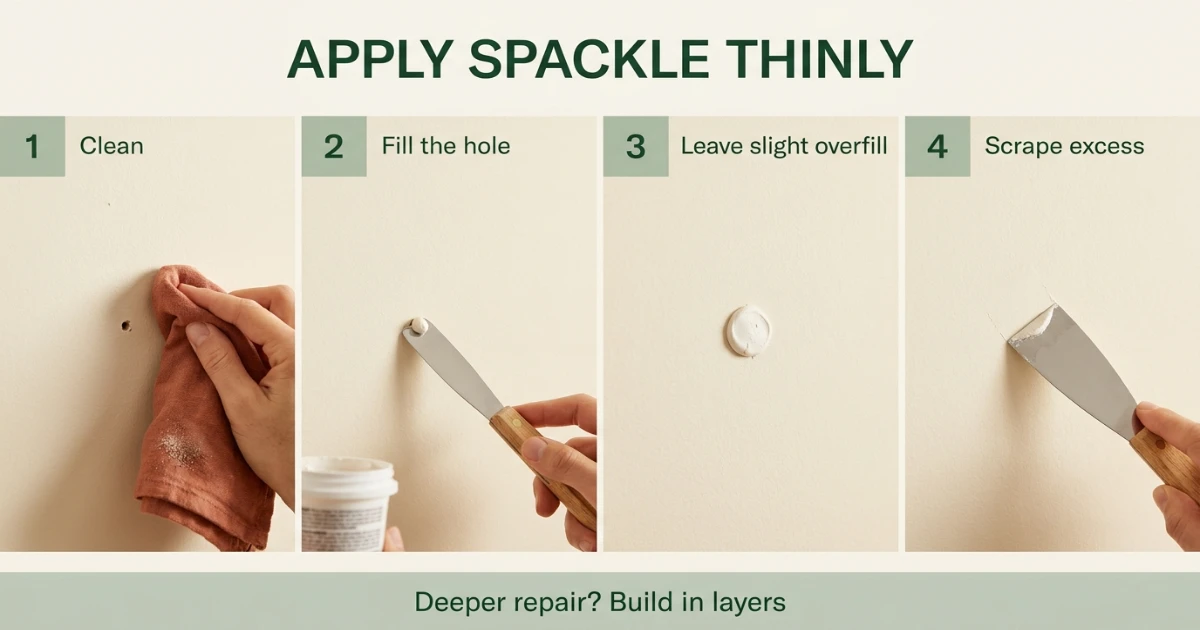
Use a dry cloth or a very lightly dampened sponge to remove dust, cobwebs, or debris from the wall around each hole. Do not soak the wall—moisture can damage the paint or drywall. Allow the area to dry completely before proceeding. If there is any loose paint or crumbling material around the hole, gently brush it away with a dry cloth.
Load the Putty Knife with Spackle
Scoop a small amount of lightweight spackling compound onto the edge of the putty knife. You need much less than you think—a pea-sized amount is usually enough for several small nail holes. Scrape off any excess on the rim of the container so you are working with a thin, controlled layer.
Fill the Hole and Remove Excess
Press a small amount of spackling compound into the opening and draw the putty knife across the repair to remove excess from the surrounding paint. Follow the exact product instructions for fill depth. DAP’s current DryDex guidance says to overfill slightly so the repair can be sanded flat after drying, and to build repairs deeper than 1/8 inch in layers rather than one thick application.
Let the Spackle Dry Completely
Drying time varies depending on the product, the depth of the fill, the room temperature, and the humidity level. Some spackling products include a color-change indicator that shifts from pink to white when the material is dry enough to sand. If your product does not have this feature, check the manufacturer’s instructions for the recommended drying window. Do not rush this step—sanding spackle that is still damp will smear it across the wall and create a larger repair area.
Sand the Patch Smooth
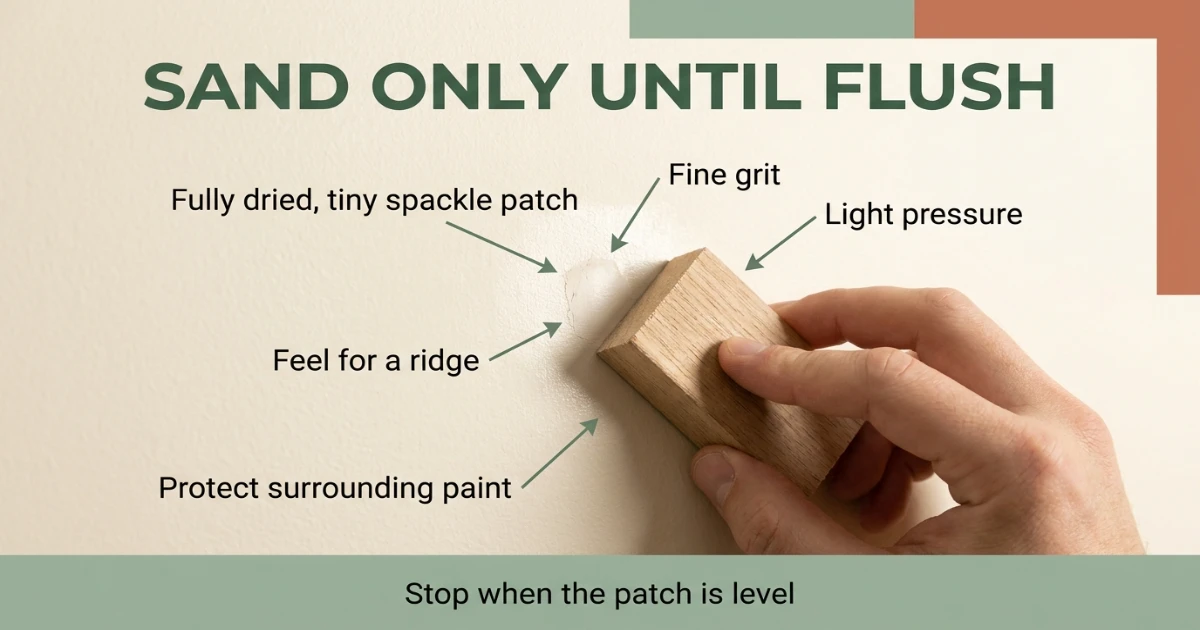
Using fine-grit sandpaper or a sanding block, lightly sand the dried spackle until it is flush with the surrounding wall surface. Use gentle, circular motions. Check frequently with your fingertips—you should not be able to feel a ridge or bump where the patch meets the original wall. Wipe away all dust with a dry or lightly dampened cloth and allow the area to dry.
Pre-1978 Paint Safety
If the rental was built before 1978 and the painted surface may contain lead-based paint, do not casually sand, scrape, or disturb it. EPA warns that repair work that disturbs lead-based paint can create hazardous lead dust. Ask the landlord or property manager how the repair should be handled before sanding.
Apply a Second Coat if Needed
Some spackling products shrink slightly as they dry. If you notice a small depression after sanding, apply a second thin layer of spackle, let it dry completely, and sand again lightly. It is always better to build up thin layers than to apply one thick layer that takes a long time to dry and may crack.
Touch Up with Matching Paint
Once the patch is smooth and completely dry, apply a small amount of touch-up paint using a small brush or foam applicator. Dab the paint onto the patched area, feathering the edges slightly so the paint blends into the surrounding wall. Do not overload the brush—multiple thin applications look better than one heavy coat. Allow the touch-up paint to dry completely before evaluating the result.
Evaluate and Document
Step back and look at the repaired wall from several angles and under different lighting conditions. If the repair is visible, it may need another light sanding or another thin touch-up coat. When you are satisfied, photograph the repaired wall using the same angles and lighting as your earlier photos. Keep these images organized and dated for your records.
Surface Compatibility: Drywall vs. Plaster vs. Other Materials
The patching method described above works well on standard painted drywall, which is the most common wall surface in modern US apartments. But not every wall is drywall. Older buildings may have plaster walls, and some areas like bathrooms or kitchens may have different surface materials that require a different approach.
| Surface Type | Spackle Works? | What to Watch For | Alternative Approach |
|---|---|---|---|
| Standard painted drywall | Yes, for small holes | Check that paint is well-adhered and not flaking | No alternative needed for small holes |
| Plaster walls | Yes, but with caution | Plaster can be harder and less forgiving; avoid over-sanding | Use a lightweight spackle; if the plaster is crumbling, contact your landlord |
| Wallpaper or vinyl wall covering | No | Spackle will not blend into wallpaper; the repair will be obvious | Do not attempt; contact your landlord or leave as-is with documentation |
| Tile or non-painted surfaces | No | Spackle is not designed for tile, stone, or glossy surfaces | Use an appropriate filler for the specific material, or consult your landlord |
| Wood paneling or trim | Sometimes | Spackle can work on painted wood, but staining and finish matching is difficult | Use a wood filler matched to the finish; test in an inconspicuous spot first |
Do Not Guess on Unfamiliar Surfaces
If you are not certain what material your wall is made of, or if the surface is wallpapered, tiled, or has a specialized finish, do not experiment. A failed repair can look worse than the original hole and may create additional damage that the landlord has to fix. Contact your property manager in writing and ask how they would like the repair handled.
Paint Matching: The Hardest Part of a Clean Repair
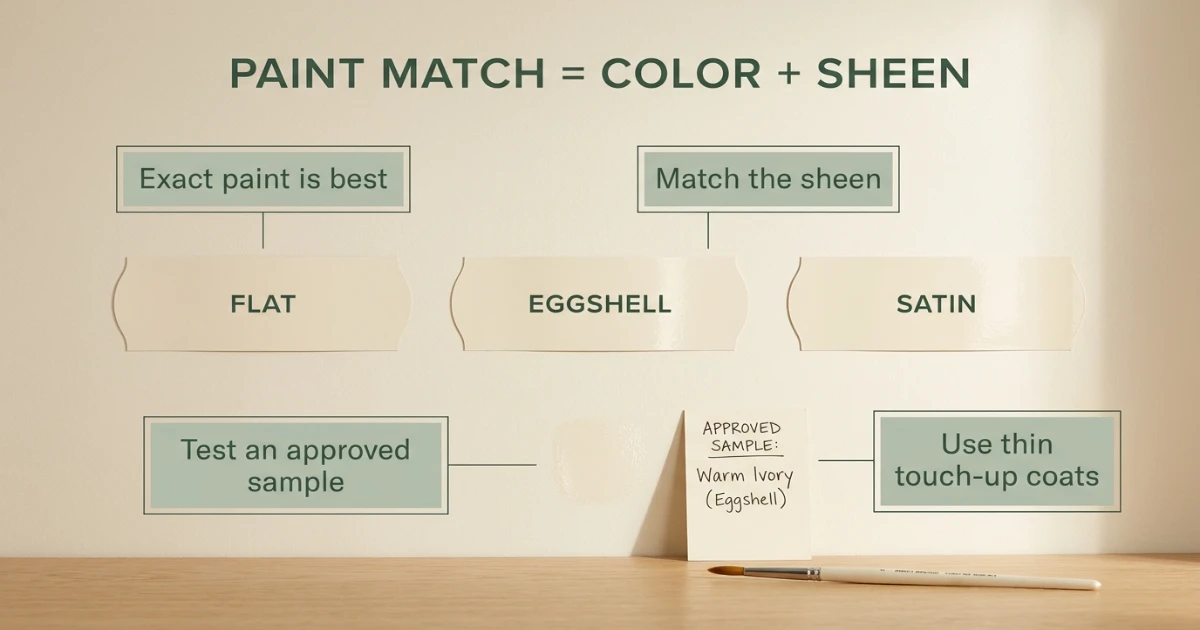
Even a perfectly applied spackle patch will be visible if the touch-up paint does not match the wall. Paint matching involves two factors: the color and the finish. Both must be close to the original for the repair to disappear.
How to Match Paint in a Rental
- Check for leftover paint. Some landlords leave a can of touch-up paint in the unit, a closet, or a storage area. Check before you buy anything. Using the exact same paint is the best possible outcome.
- Ask your landlord. Many property managers keep paint records and can tell you the exact brand, color name, and finish used in your unit. Request this information in writing.
- Do not create a new paint chip without permission. If you cannot get the original paint information, ask the landlord for the paint specification, approved leftover paint, or an approved sample. If an already-loose chip exists and the landlord approves its use for matching, a paint store may be able to scan it.
- Match the finish, not just the color. Flat, eggshell, satin, and semi-gloss finishes reflect light differently. A color match in the wrong finish will still be visible. If you are unsure of the finish, compare your touch-up area to the surrounding wall under different lighting angles.
Test Your Paint Match Before Committing
If your lease permits touch-up painting, test the match only in an approved inconspicuous location or on a separate sample card first. Let it dry fully before judging color and sheen. A paint that looks correct while wet can dry noticeably lighter, darker, flatter, or glossier than the existing wall.
Common Mistakes That Make Repairs More Visible
Most failed nail hole repairs are not the result of a difficult process—they happen when renters rush, skip steps, or use the wrong products. Here are the mistakes that most often lead to a visible patch or additional wall damage.
| Mistake | Why It Is a Problem | How to Avoid It |
|---|---|---|
| Overfilling the hole with spackle | Creates a raised bump that is visible even after sanding | Apply a thin layer, scrape off excess, and build up with additional thin layers if needed |
| Sanding before the spackle is fully dry | Smears wet spackle across the wall, creating a larger repair area | Check the manufacturer’s drying time and use a color-change product if possible |
| Using coarse sandpaper | Scratches the surrounding paint, leaving a dull or rough patch | Use 220-grit or finer for finish sanding; use gentle pressure |
| Skipping the cleaning step | Dust and debris prevent the spackle from adhering properly | Clean the area around each hole before patching |
| Using the wrong paint finish | A color match in the wrong sheen is still visible | Confirm the finish with your landlord or match it to the surrounding wall |
| Applying too much touch-up paint | Creates a raised paint edge or a visible shiny spot | Use thin coats and feather the edges; allow each coat to dry |
| Attempting to repair wallpaper or specialty surfaces | Spackle and paint will not blend into non-painted surfaces | Do not attempt; contact your landlord instead |
For a broader look at mistakes that cost renters their deposits, see our guide to apartment decor mistakes.
When to Contact Your Landlord Instead of Patching
Not every nail hole repair should be a DIY project. In some situations, contacting your landlord or property manager first is the smarter, safer move. This is especially true when the repair is larger than expected, the wall surface is unfamiliar, or your lease has specific repair provisions.
Contact Your Landlord If:
- The opening is larger than a simple nail or screw hole, contains an anchor, or has damaged edges
- There is cracking, crumbling, or water damage around the hole
- The wall is wallpapered, tiled, or has a specialty finish you cannot identify
- Your lease prohibits tenant repairs or requires landlord approval
- You cannot match the paint color or finish closely enough
- There are many holes across multiple walls, suggesting a full wall repaint may be needed
- You are unsure how the lease or local rules classify the wall condition
When you contact your landlord, do so in writing. Describe the situation clearly, include photos if possible, and ask how they would like the repair handled. Save their response. Written communication creates a record that protects you if there is a dispute later.
Move-Out Documentation: Protecting Your Deposit
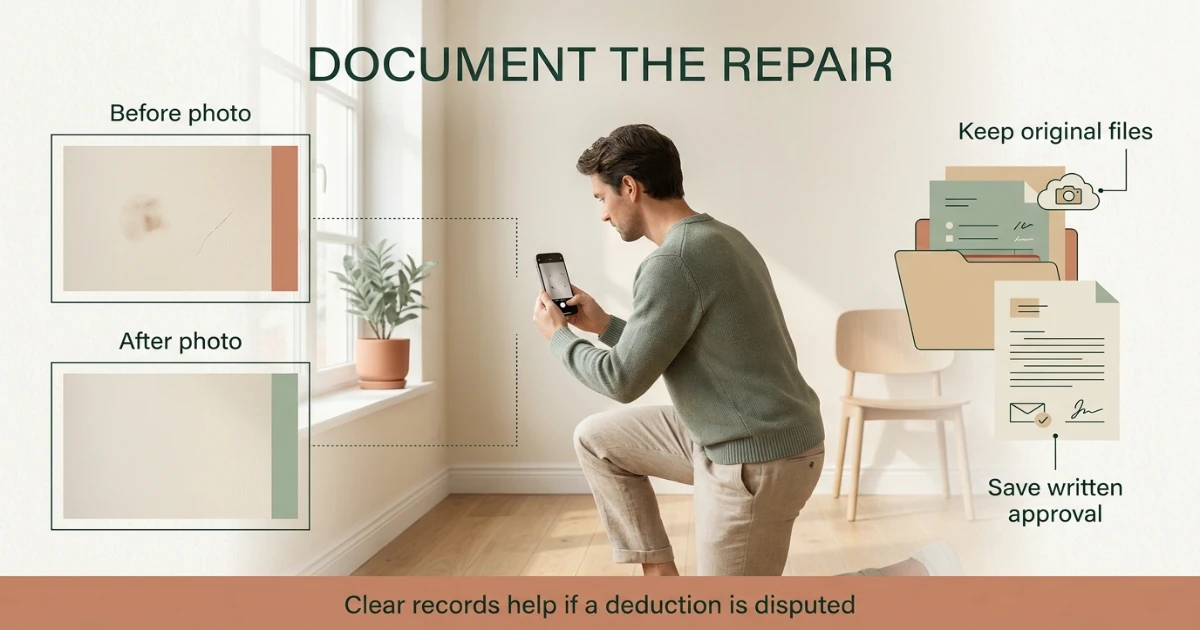
Even the best repair job is only as strong as your documentation. Move-in and move-out photos, written landlord communication, and dated records are your deposit protection toolkit. They prove what the wall looked like before you decorated and what it looked like after you repaired it.
Move-Out Documentation Checklist
- Photograph every wall after repairs are complete, using the same angles as your move-in photos
- Take close-up photos of each repaired area to show the quality of the work
- Keep all move-in photos organized and accessible for comparison
- Save written landlord communication about any repairs, approvals, or questions
- Keep receipts for any spackle, paint, or supplies you purchased for the repair
- Request a move-out walkthrough with your landlord or property manager if available in your area
- Keep the documentation through the deposit-return process and for the applicable period in which a claim or dispute could still be brought under state or local law
If a wall-repair deduction is disputed later, original photos, inspection records, receipts, and written repair approvals can help establish what the wall looked like before and after your work. Documentation does not guarantee the outcome, but it gives you a clearer record to rely on.
Renter-Safe Product Pick for Nail Hole Patching
One product stands out for renters tackling small nail hole repairs: a lightweight spackling compound with a color-change indicator. The color-change feature removes the guesswork about drying time, which is one of the most common reasons repairs go wrong.
As an Amazon Associate I earn from qualifying purchases.
DAP DryDex Dry Time Indicator Spackling — 8 fl oz
DAP’s current DryDex Spackling is a ready-to-use repair compound for surfaces including drywall, plaster, wood, and stucco. Its dry-time indicator goes on pink and changes to white when the repair is dry enough for sanding and painting.
Verified product: DAP DryDex 8 fl oz, SKU 7079812328 / code 12328. For repairs deeper than 1/8 inch, DAP says to apply the spackling in layers and let each layer dry before adding the next.
Caution: A simple spackle repair is not a substitute for a patch system when drywall paper, anchors, cracks, moisture damage, or crumbling material are involved. Follow the current DAP instructions and your lease.
Check Price on AmazonWhat to Look For in a Putty Knife
A flexible 1 to 3-inch putty knife with a smooth, clean edge works well for most nail hole repairs. Look for a blade that flexes slightly under pressure—this helps you apply spackle smoothly without gouging the wall. Avoid rigid blades that are hard to control on small repairs. If you have multiple holes to patch, a small set with different blade widths can be useful, but a single 1.5-inch flexible knife is sufficient for most renters.
Sources & Renter-Safety Note
This guide provides general renter-focused repair information, not legal advice. Security-deposit rules and normal-wear standards vary by lease, jurisdiction, and housing program. For the repair product, use the current manufacturer instructions for the exact item you purchase.
The Bottom Line
Patching a clean, small nail hole can be a manageable renter repair when the lease permits it, but the safest process is conservative: identify the wall material, use a compatible repair product, build deeper fills in layers, let the compound dry fully, sand only as needed, and match both paint color and sheen. Preserve before-and-after photos. If the wall may contain lead-based paint, has an anchor or torn paper, is cracking or crumbling, or you cannot verify the paint finish, ask the landlord in writing instead of guessing.
For guidance on avoiding nail holes entirely, see our complete guide to hanging art without nails.
Learn to Hang Art Without the Holes
Now that you know how to repair nail holes, discover how to avoid them altogether. Our guide covers adhesive strips, tension rods, leaning displays, and other renter-safe methods that leave your walls untouched.
Read the No-Nail Hanging GuideFrequently Asked Questions
Can I patch nail holes myself or should I ask my landlord?
It depends on your lease, the size of the holes, and your comfort level with the process. Small pin holes and standard nail holes are generally safe for tenants to patch themselves using lightweight spackle. However, some leases prohibit tenant repairs or require landlord approval. Review your lease first. If it is unclear, ask your property manager in writing and save the response. Larger holes or unfamiliar wall surfaces should be handled by the landlord or a professional.
What size nail holes can I safely patch myself?
There is no single universal diameter cutoff that makes a repair renter-safe. A clean nail or small screw hole with sound edges may be suitable for a simple spackle repair, while an anchor hole, torn drywall paper, cracking, crumbling material, or an unfamiliar surface may need a patch system or landlord attention.
How do I match the paint color in my rental?
Start by asking the landlord or property manager for the exact paint brand, color, product line, and sheen or for approved leftover touch-up paint. Do not remove a new chip from the wall without permission. Match both color and sheen, and let a test sample dry before judging it.
How long should I wait before painting over spackle?
Drying time varies by product, fill depth, room temperature, and humidity. Some spackling products include a color-change indicator that shifts from pink to white when dry. If your product does not have this feature, check the manufacturer’s instructions for the recommended drying window. Do not paint over spackle that is still damp—it will not adhere properly and can create a visible blemish.
Will my landlord notice patched nail holes?
A well-executed patch with a close paint match can be nearly invisible under normal lighting. The key is to avoid overfilling, sand smoothly, and match both the paint color and finish. If the repair is visible, it may need another light sanding or another thin touch-up coat. In some cases, especially with older paint or unusual finishes, a perfect match is difficult. Document your repair work with photos so you have evidence of a good-faith effort.
Should I document the repairs I made before moving out?
Yes. Photograph every repaired area after the work is complete, using the same angles and lighting as your move-in photos. Keep your move-in photos organized for comparison. Save any written communication with your landlord about repairs. Keep receipts for any supplies you purchased. This documentation is valuable evidence if a deposit dispute arises.
What if I already have larger holes from wall anchors or shelves?
Do not treat anchor holes, torn drywall paper, cracked edges, crumbling material, or other larger damaged areas as ordinary nail holes. They may need a patch system, sealing step, or professional repair. Contact your landlord in writing and ask how they want the wall restored before changing it further.