How to Repair Minor Wall Damage in a Rental
A practical, deposit-minded guide to fixing small nail holes, scuffs, and scratches without making the problem worse.
For most minor wall damage in a rental—small nail holes, shallow dents, light scuffs, and hairline cracks—you can use lightweight spackle or a small-hole repair kit, a putty knife, fine-grit sandpaper, and touch-up paint. The key is to match the existing wall texture and sheen, keep the repair area small, and always check your lease and move-in documentation before starting. Minor repairs are often acceptable, but incorrect products or poor color matching can make the damage more visible and increase deposit risk.

At a Glance
Before Starting: Lease, Photos, and Damage Check
Repairing minor wall damage in a rental is usually a practical decision—but it starts with paperwork, not spackle. Review your lease to see whether it says anything about tenant repairs, painting, or wall alterations. Some leases prohibit tenants from making repairs or painting without written permission. Others are silent on the issue, which means the repair may be fine but the result still needs to look consistent with the original condition.
Check your move-in inspection form or any move-in photos you took. If the damage you want to fix was already present, your repair may not be necessary at all. If you decide to fix something that predates your tenancy, you could accidentally make it look worse or create a sheen mismatch that draws attention.

Document the wall condition before you begin. Take dated photos of the damage from a few angles, then take photos again after the repair. If you communicate with your landlord or property manager about the repair, do it in writing. This creates a clear record if there is a dispute later.
Assess the Damage Before Choosing a Fix
Minor wall damage falls into a few common categories in rentals. Identifying the type of damage, the wall surface, and the existing paint finish will determine whether a repair is realistic for you to do well.
Common Types of Minor Wall Damage
Small nail or screw holes: These are the most common and usually the easiest to repair with lightweight spackle or a small-hole repair kit. They are typically 1/8 inch or smaller in diameter.
Shallow dents and dings: Furniture bumps, door handle impacts, and moving mishaps often leave small indentations that need a thin filler layer.
Scuffs and black marks: Shoe scuffs, furniture rubs, and bag marks can sometimes be cleaned rather than patched. Start with a damp cloth or a very mild cleaner before reaching for spackle.
Hairline cracks: Small cracks along drywall seams or corners can be filled with a thin layer of spackle or paintable caulk, but recurring cracks may indicate settling and should be reported to your landlord instead.
Peeling paint or torn drywall paper: These are trickier. If you try to patch torn paper without sealing it first, the filler may bubble or peel. For anything larger than a couple of inches, you may be better off asking your landlord.
If the damage is larger than a few inches, involves water, exposes the wall cavity, or is located near electrical fixtures, stop and report it to your landlord or property manager. Attempting a repair beyond minor cosmetic work can create liability and safety issues.
Tools and Materials for a Small Wall Repair
Most minor wall repairs in a rental require only a few inexpensive items. You likely already own some of them. The goal is to use products that are easy to control, dry quickly, and can be smoothed to match the surrounding wall.
| Item | Purpose | Renter Notes |
|---|---|---|
| Lightweight spackle or small-hole repair kit | Fills holes, dents, and minor cracks | Choose a product that dries fast and sands easily. Check the label for drywall suitability. |
| Small putty knife (2–4 inches) | Applies and smooths filler | A flexible blade helps feather the edges. |
| Fine-grit sanding sponge or sandpaper (180–220 grit) | Smooths dried filler | Avoid coarse grit, which can leave visible scratches. |
| Touch-up paint matched to the wall | Blends the repair into the surrounding paint | Match both color and sheen. Flat, eggshell, satin, and semi-gloss all reflect light differently. |
| Small paint brush or foam applicator | Applies touch-up paint | A tiny brush is easier to control than a roller for nail holes. |
| Clean, damp cloth | Cleans the area and removes dust | Let the wall dry fully before applying filler or paint. |
If you do not have touch-up paint, check whether the property manager or landlord can provide a small amount. Many apartment communities keep standard paint colors on file. If not, you can take a chip of paint to a hardware store for color matching, but be aware that even a good match may show under certain lighting if the sheen is slightly different.
Step-by-Step: Repairing Small Nail Holes and Dents
This process works for most small holes and shallow dents in painted drywall. The key is patience between steps—rushing drying time or sanding too aggressively creates more problems than it solves.
Step 1: Clean and Prep the Area
Wipe the damaged area with a dry or slightly damp cloth to remove dust and debris. If there is any loose paint or drywall paper, gently remove it without tearing surrounding material. Let the area dry completely before moving on.
Step 2: Apply the Filler
Use a small putty knife to press lightweight spackle into the hole or dent. For nail holes, press the filler in and then draw the knife flat across the surface to remove excess. For dents, apply a thin, even layer and feather the edges outward so the patch blends with the surrounding wall. Avoid leaving a raised mound, which will require extra sanding later.
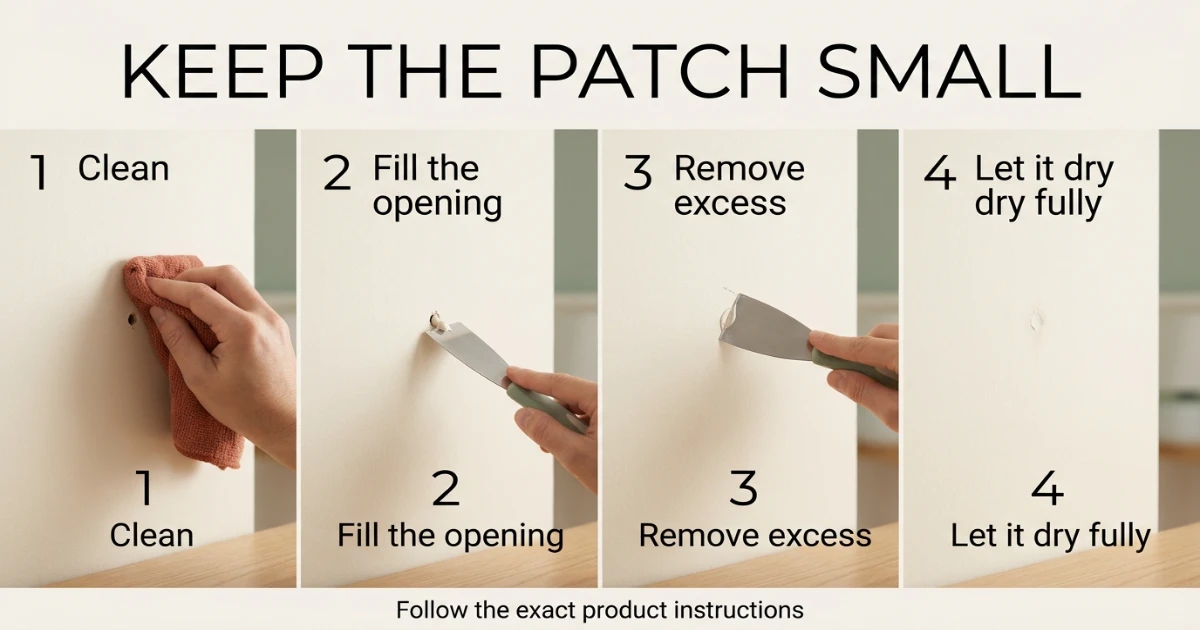
Step 3: Let It Dry Completely
Follow the drying time on the product label. Lightweight spackle often dries in 30–60 minutes for very small holes, but thicker applications can take several hours. If you sand or paint over wet filler, it will gum up your sanding tool and create an uneven finish.
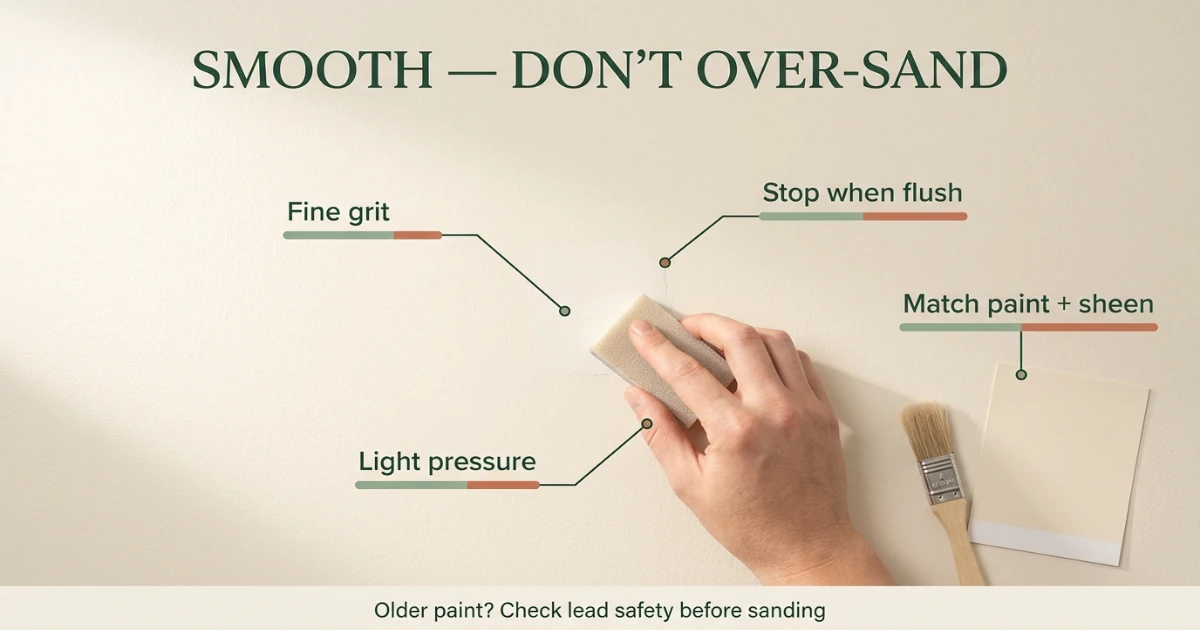
Step 4: Sand Smooth
Use fine-grit sandpaper or a sanding sponge to gently smooth the dried filler. Sand with light pressure in a circular motion, then wipe away dust with a dry cloth. The surface should feel flush with the surrounding wall. If you can feel a ridge, apply a second thin coat of filler, let it dry, and sand again.
Step 5: Prime If Needed
For very small repairs, touch-up paint may be enough. For larger patches, bare spackle can absorb paint differently than the surrounding wall, causing a dull spot. A thin coat of primer or a paint-and-primer-in-one matched to your wall color can help create a uniform finish. If you are unsure, test a small area first.
Step 6: Touch Up the Paint
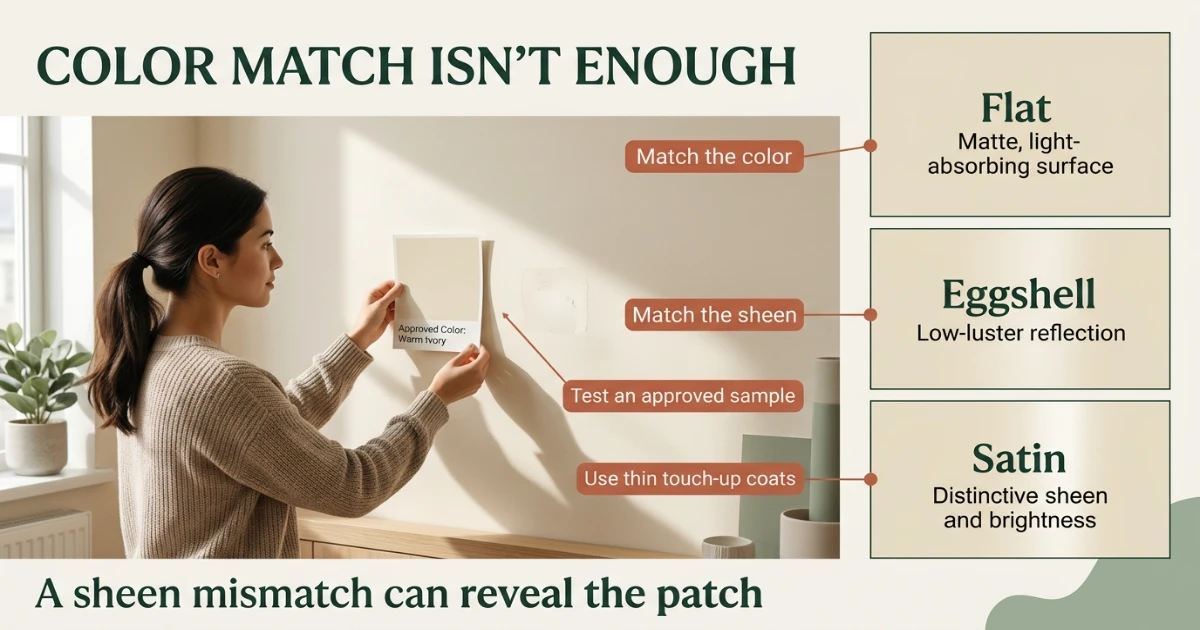
Using a small brush or foam applicator, apply the smallest amount of paint needed to cover the repair. Dab or lightly brush it on, feathering the edges into the surrounding paint. Avoid heavy brush strokes, which can create visible texture differences. Let it dry fully, then inspect under different lighting to check for sheen mismatch.
Surface and Method Comparison
Not all minor wall damage should be handled the same way. The surface type, damage size, and available materials all affect the right approach. This comparison focuses on the most common rental situations.
| Repair Method | Best For | Renter-Deposit Risk | When to Avoid |
|---|---|---|---|
| Lightweight spackle + touch-up paint | Small nail holes, screw holes, shallow dents | Low if matched well | Large holes, wet areas, or walls with unusual texture |
| Patching compound with mesh tape | Larger holes up to a few inches | Moderate—requires more skill to blend | Areas with electrical or plumbing access |
| Mr. Clean Magic Eraser or gentle cleaning | Surface scuffs, shoe marks, small smudges | Low if paint is not worn away | Glossy or delicate painted surfaces that may dull |
| Paint touch-up only | Small chips or scratches with no indentation | Low if color matches | Large damaged areas or mismatched paint |
| Leave it and report to landlord | Water stains, recurring cracks, holes larger than a few inches | Can be lower than a bad DIY repair | Never ignore signs of moisture or structural issues |
Decision Logic: Choose This When…
Choose lightweight spackle when the hole is small, the wall is standard painted drywall, and you can match the paint reasonably well.
Choose a cleaning-only approach when the mark is on the surface and there is no dent or paint loss. Test in an inconspicuous area first.
Choose to report instead when the damage involves water, electrical fixtures, recurring movement, or is larger than you can feather smoothly. A bad patch can look worse than the original damage.
Product Recommendation for Small Holes
As an Amazon Associate I earn from qualifying purchases.

3M High Strength Small Hole Repair Kit
If this product is not available or you prefer a more basic approach, a standard lightweight spackle and a small putty knife will handle most nail holes. The most important factor is not the brand—it is the application technique and paint matching.
Mistakes to Avoid When Repairing Rental Walls
Most bad rental wall repairs come from rushing or using the wrong product for the surface. These are the most common issues to watch for.
Aggressive sanding can wear away the surrounding paint and texture, leaving a shiny or smooth spot that stands out more than the original hole. Use fine grit and light pressure.
Paint comes in flat, eggshell, satin, semi-gloss, and high-gloss finishes. Even if the color is exact, a different sheen will catch light differently and make the patch visible. If you cannot match the sheen, the repair may look worse than the damage.
Caulk is flexible and designed for gaps and joints, not for filling holes in drywall. It shrinks, does not sand well, and can leave a visible, uneven surface.
Water stains, recurring cracks, holes near outlets or switches, and anything involving moisture are not cosmetic repairs. Attempting to patch these can hide a problem your landlord needs to know about and may create safety or liability issues.
Alternatives When a DIY Repair Feels Too Risky
Sometimes the lowest-risk option is not to repair at all. If the damage is in a prominent location, the paint is hard to match, or the wall has a distinct texture, a repair attempt could draw more attention than the original mark.
Option 1: Ask Your Landlord
Many property managers would rather handle small wall repairs themselves using the exact paint and technique they already use. Send a written note describing the damage and asking whether they prefer to repair it or have you handle it. This can protect you from a deduction dispute later.
Option 2: Use a Matching Texture Patch
For walls with heavy orange-peel or knockdown texture, standard spackle may leave a smooth spot that stands out. Some repair kits include texture-matching tools, but they require practice. If you are not confident, consider whether the repair will look better than the original damage.
Option 3: Cover Strategically
If the damage is small and located in a low-visibility area, you might choose to leave it and focus on documenting the condition. If the location allows, a renter-friendly decorative solution—like a lightweight wall hanging or removable art—can be a lower-risk way to visually minimize the area without altering the wall.
For more on renter-friendly wall solutions, see our guide to no-damage wall decor ideas.
Sources & Renter-Safety Note
This article covers general cosmetic repair techniques that are commonly accepted in rental housing, but rules vary by state, city, lease, and property. Before making any repair, review your lease, check your move-in documentation, and consider whether written landlord communication is appropriate.
- U.S. Department of Housing and Urban Development — Tenant Rights and Responsibilities
- USA.gov — State Rental Housing Assistance and Tenant Resources
For product-specific questions about dry time, surface compatibility, application limits, and removal, always check the current manufacturer instructions before use. Numerical limits and technical specifications can change over time.
Frequently Asked Questions
Can my landlord charge me for nail holes?
It depends on your lease, state law, and how the holes are classified. Small nail holes are often considered normal wear and tear, but larger holes or excessive damage may be treated differently. Document the condition with photos and review your local tenant rights. Our guide on can your landlord charge for nail holes covers this in more detail.
What is the easiest way to fix small nail holes without repainting the whole wall?
For small nail holes, use lightweight spackle to fill the hole, let it dry, sand it smooth, and apply a tiny amount of matched touch-up paint with a small brush. The key is feathering the paint edges so the patch blends into the surrounding area.
Can I use toothpaste to fill nail holes?
Toothpaste is not a reliable wall repair material. It shrinks, can discolor over time, and does not create a durable, paintable surface. Lightweight spackle or a small-hole repair product is a safer choice for a rental.
How do I match the paint color in my apartment?
Start by asking your landlord or property manager if they can provide the paint code or a small sample. If not, you can take a small chip of paint from an inconspicuous area to a hardware store for color matching. Match both the color and the sheen—flat, eggshell, satin, and semi-gloss all look different on the wall.
Should I repair wall damage or tell my landlord?
For small, cosmetic issues that you can match well, a careful repair may reduce deposit risk. For water damage, recurring cracks, holes near electrical fixtures, or anything larger than a few inches, tell your landlord in writing. Attempting a repair beyond minor cosmetic work can create more liability.
What if my apartment has textured walls?
Textured walls are harder to patch invisibly. Standard spackle will dry smooth, leaving a noticeable spot. Some repair kits include texture-matching tools, but practice on a spare surface first. If the texture is heavy, the lowest-risk option may be to ask your landlord for the preferred repair method.
Renter-Safety Verdict
Repairing minor wall damage in a rental can be a smart, deposit-minded move when the damage is small, the surface is standard painted drywall, and you can match the paint reasonably well. The lowest-risk approach is to use lightweight spackle, apply it thinly, sand gently, and touch up with matched paint. Document the before and after with photos and keep any written communication with your landlord.
Avoid attempting a repair when the damage involves water, electrical fixtures, recurring cracks, or areas larger than a few inches. A bad patch can look worse than the original damage and may increase your deposit risk. When in doubt, ask your landlord in writing. The goal is to leave the wall looking as close to move-in condition as possible—not to create a new visible problem.
Prevent Future Wall Damage Before It Happens
Now that you know how to repair minor wall damage, the best strategy is to avoid it from the start. Explore renter-friendly wall decor options that look great without leaving a trace.
Learn to Hang Art Without Nails